I am getting this in by the “skin of my teeth” before February ends, no pun intended since it is Pet Dental Health Month! In the spirit of dental health – this case will revolve around a common oral tumor that we see in dogs. This stresses the importance of having your pet’s teeth fully evaluated which is part of the routine dental cleanings that your veterinarian can perform, especially as your furry friend ages. Countless times (including the following case), I am referred cases of oral tumors that were noted and biopsied by the family veterinarian.
There are many types of oral tumors and they can range in both their local aggressiveness and there ability to spread to other areas and significantly shorten your pets life and diminish their quality of life. The overall prevailing thought is that early detection of an oral tumor can increase the odds of a successful outcome in many cases. Any new nodules/bumps noted in the mouth or along the jaw line or nose should be brought to your veterinarians attention for further investigation.
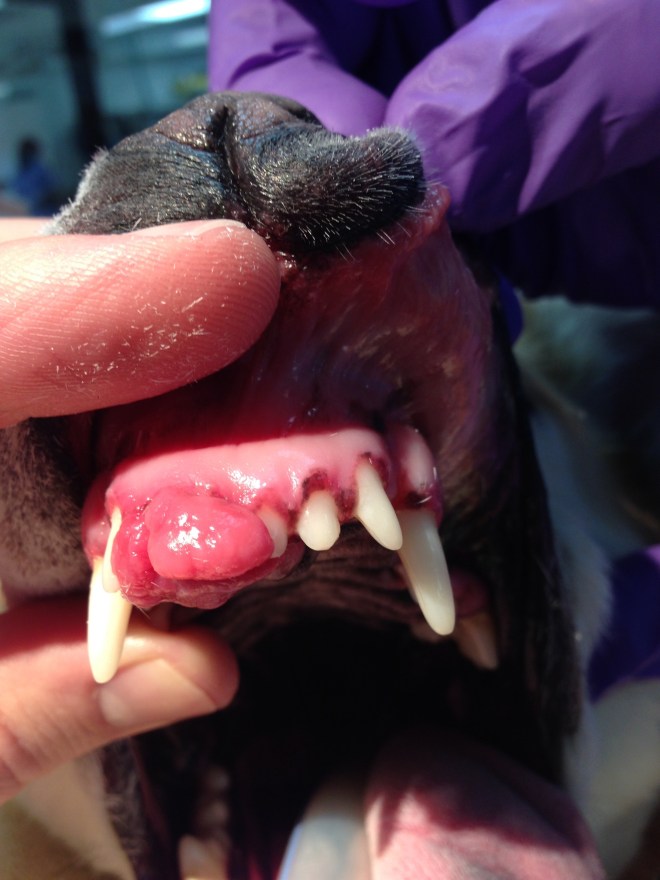
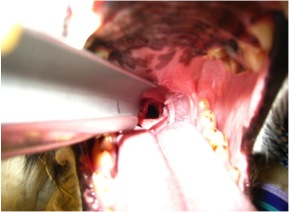
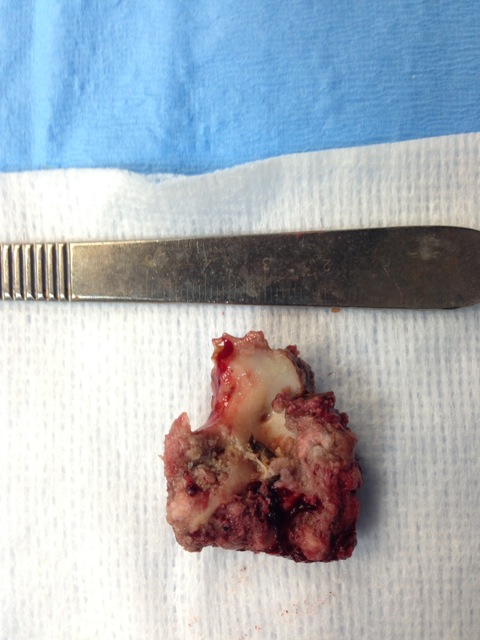
The case for this month, involves a German Shepherd mix that presented to me for a mass that was noted in the front of the mouth – incisor 1-3 on the right side of the maxilla (upper jaw). This was noted on a routine dental examination and was biopsied before seeing me. (I love it when patients come with the oral mass already biopsied – it removes that first step for me). It is very important that oral tumors are biopsied prior to developing the final surgical plan. The size/extent of the surgery is very dependent on the tumor type – some are less aggressive and require less of an extensive surgery than others. Also, knowing what we are dealing with can help us predict the course of the disease and survival times.
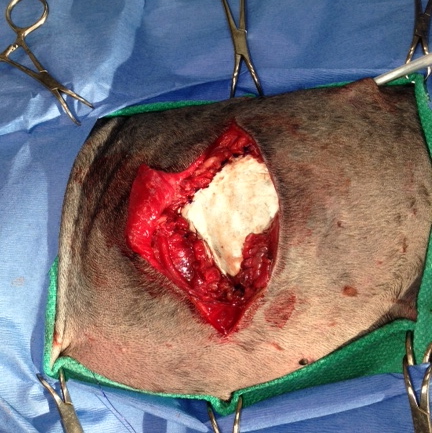
Figue 1: Picture of the oral mass on the upper jaw.
The tumor’s biopsy results revealed that it was an acanthotamous epulis/ameloblastoma. The epulid tumors come in three varieties with this type being the most common. These types of tumors can behave locally aggressive (invading into the local soft tissue and destruction of the underlying bone), however they tend to not metastasize (spread to other organs). With this type of tumor, because it doesn’t have a tendency to spread elsewhere, the next step is to perform a CT scan of the head to evaluate the extent of the tumor, which guides us in the surgical planning for tumor removal. If the patient has other concerns, a more thorough work-up may be needed (chest evaluation and abdominal ultrasound). A Complete Blood Count/Chemistry profile/Urinalysis is performed prior to an aggressive surgery and anesthetic event.
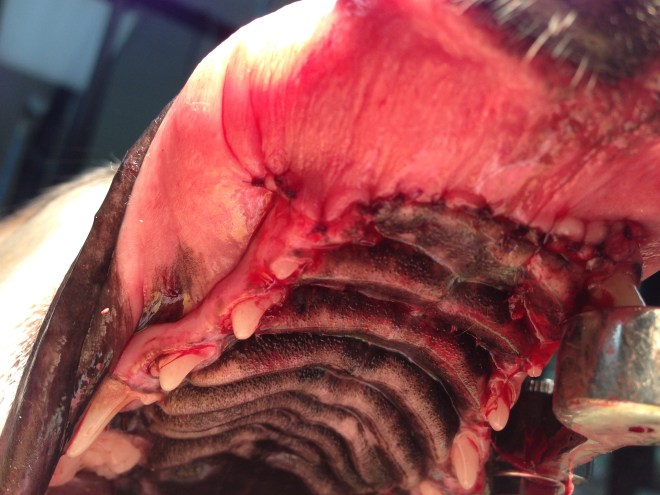
With these types of tumors, local excision is generally necessary along with removal of the underlying and surrounding bone. This is why it is so important to catch oral tumors early. I have certainly seen these tumors (among others), where they are too big to safely remove, that will still allow the pet to be comfortable and function normally. Luckily for this dog, she was able to do without the front portion of teeth and bone (incisive bone) and this left her with no visual abnormality, once her fur grew back! The last thing that we look at following surgery is our margin assessment, which tells us whether we removed it all and by how much. For this lucky girl, no further treatment was needed!
Figure 2: Immediately following removal of mass and affected bone/teeth.
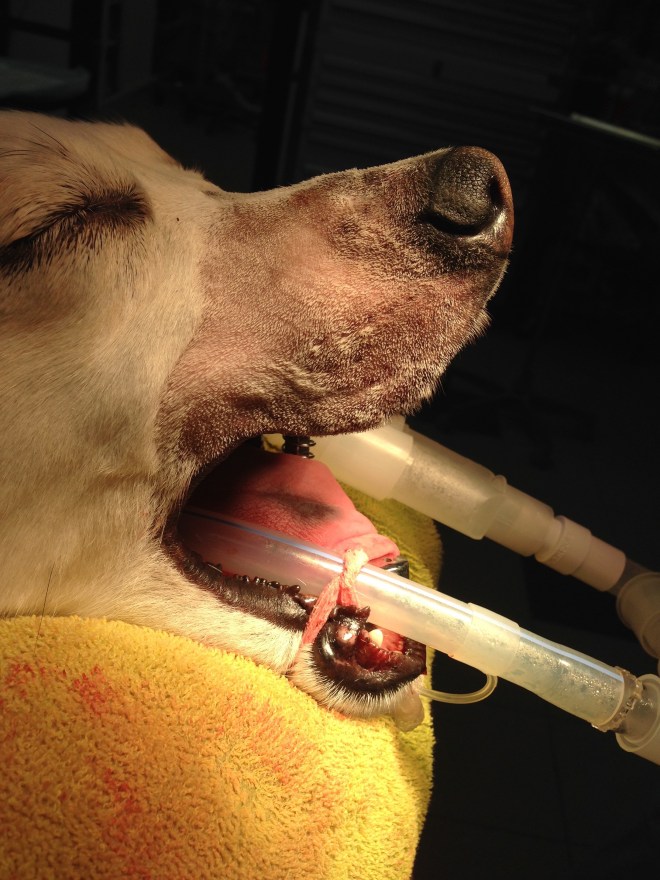
Figure 3: Patient is visually normal following surgery.
Spring and summer bring about so many good things: the beach, warm weather, family gatherings, to name a few; and then some bad things: bugs, sweltering heat and humidity, allergies, and the list goes on. For your pets, especially your older retrievers and short nosed (brachycephalic) breeds like the pug and bulldog, the heat and humidity can spell danger due to airway conditions. For more information on the brachycephalic dog breathing issues, see my other post http://wp.me/p2vvxS-2R . This article will focus on a condition called laryngeal paralysis which typically affects our large breed dogs, such as the Labrador Retriever and similar breeds, although it has been seen in cats (rarely) and is a defined disease process in horses.
What is laryngeal paralysis?
Laryngeal paralysis can be as bad as it sounds. The larynx is at the back of the mouth and allows the passage of air into the windpipe (trachea). In the video below, it mimics swinging doors and the cartilages (arytenoid cartilage) that form the larynx will open when breathing “in” (inspiration) and open when breathing “out” (expiration). It remains closed during other actions, like eating and swallowing, thus stopping food, water, saliva from going down the trachea. There is a muscle that controls the opening of these cartilages. The muscle (cricoarytenoideus dorsalis muscle) sits on top of the cartilages on both sides and actively contracts to open the cartilages during inspiration. The opening of the cartilages when exhaling is passive as the air blows open the cartilages. Laryngeal paralysis is a condition where the nerves that feed this muscle are not working properly and the muscle atrophies and is nonfunctional – hence the larynx is paralyzed and can’t move normally.
What causes this condition???
In most dogs, we do not know the reason for this condition. We divide the condition into two general types: 1. congenital and 2. acquired. In congenital, this condition is usually seen at an early age and is thought to be hereditary. Some common breeds affected are Siberian Huskies, Bulldogs, Rottweilers, etc. In the second form (acquired), it simply means that the disease occurs secondary from other issues. When we think of causes we have to ask ourselves, what can cause damage/changes to the nerve (recurrent laryngeal nerve) that feeds the cricoarytenoideus dorsalis muscle? Conditions that we evaluate for typically are as follows: cervical (neck) tumors, chest/lung tumors, myasthenia gravis, peripheral neuropathies, previous neck (cervical) trauma, and endocrine diseases. Most of the time, we do not find a direct cause and suspect an undiagnosed peripheral neuropathy as the underlying cause. When we do not know the actual cause we term the disease “idiopathic”. Some recent studies (Stanley, et al) have shown that most (if not all) patients with idiopathic laryngeal paralysis will begin to display some generalized neurologic signs within 1-2 years following the diagnosis.
What are the signs of acquired laryngeal paralysis???
Typically, this affects our larger breed dogs, with the Labrador Retriever being the poster child for this disease. The dogs affected are generally middle to older in age, and either male or female. The most common signs noticed is difficulty breathing, especially when exercising or excited and gagging/coughing when eating/drinking. This is a progressive disease, so signs usually begin with mild changes and become more severe, which can be over months to years. You may also notice a change in the pitch of your dogs bark (voice). Most of the time, we can arrive at a presumptive diagnosis just listening to your pet breathing. As the disease progresses, the affected dog becomes more at risk, and can have a respiratory emergency if not managed appropriately, which can be fatal. Below is a video (the audio is most important) of a dog with laryngeal paralysis:
What diagnostics are involved with laryngeal paralysis???
To begin, a thorough general and neurologic examination is needed for your pet. At minimum, a complete blood work, including a thyroid screening panel, and chest (thoracic) x-rays are needed. The importance of these is to look for other disease processes that may be going on and to ensure that the major organs are functioning appropriately. Why the thyroid panel? Hyopthyroidism (low thyroid hormone production) can cause various neuromuscular issues. With the chest x-rays we are looking for any masses, changes to the esophagus size (megaesophagus) and signs of aspiration pneumonia, which can be seen secondary with laryngeal paralysis. Because most of the patients I see with this condition are older and we are assessing for surgery, I highly recommend an abdominal ultrasound by an experienced ultrasonographer to look for any other concurrent diseases. Bear in mind, if your pet is in a respiratory crisis some of these steps may be done out of order to adequately stabilize the patient.
The best way to confirm the suspected diagnosis of laryngeal paralysis is to look directly at the larynx and assess the functioning of the laryngeal cartilages. This is typically done by inducing a light plane of anesthesia and looking at the back of the mouth. The proper assessment is sort of an art and takes practice to be comfortable making the diagnosis. In addtion to evaluating the larynx, time is taken to look at the rest of the oral cavity for other potential causes. As a surgeon, my preference is to do this examination directly prior to surgery to minimize the amount times the pet needs to undergo anesthesia.
Below is a video demonstrating laryngeal paralysis. The laryngeal opening can be seen and you will notice that it is not moving much at all during the phases of breathing.
How can I treat my pet once laryngeal paralysis is diagnosed???
Probably the better questions is when do I treat? Once a diagnosis is made, then a decision needs to be made. Since this is a progressive disease, if only one side of the larynx is affected then surgical options will most likely be delayed. The most typical treatment for idiopathic laryngeal paralysis is surgical. To date, there is no medical therapy that will restore the function of the larynx. Conservative management will typically incorporate ways to keep your pet cool (air conditioned environment), sedation possibly, and decreasing environmental allergens. If, during our pre surgical diagnostics, we find other issues, changes may be made to the treatment plan. There are some findings that may make your veterinarian reconsider your pet being a good surgical candidate, such as an enlarged esophagus (megaesophagus). The main reason to proceed forward with surgery is to improve your pets quality of life for however long that may be, as well as improve your (as the owner) life by providing more quality time together. There are risks both with surgery and without surgery.
The standard procedure to open the airway is called an arytenoid lateralization (laryngeal tie-back). This is a procedure that pulls one side of the laryngeal cartilages back, permanently opening one side of the larynx. In effect, we override the normal muscular action of the larynx. We gain access to the larynx by an incision made on the side of the neck. None of the work is done within the mouth. There are other procedures that remove the arytenoid cartilage portion of the larynx to permanently open the larynx from within the mouth, called an arytenoidectomy. This procedure, in my opinion, has not been evaluated as much as the “tie-back” procedure.
Below is a picture of an arytenoid lateralization. Notice the difference on the opening from the previous video.
What are the risks with and without surgery and what is the typical outcome?
No procedure is without inherent risks, unfortunately. The risks and benefits of any procedure must always be weighed and discussed with your veterinarian and veterinary surgeon. The most common post-operative complication is aspiration pneumonia. Recent literature cites about a 12-15% risk of aspiration pneumonia following surgery, with the most critical time period being the actual recovery from surgery and the immediate post-operative period. Some medications can be administered that help reduce vomiting, regurgitation and increasing the tone of the lower esophageal sphincter muscle – all aimed at lowering this risk. Most of the time aspiration pneumonia, if caught early, can be treated successfully with antibiotic therapy and supportive care (depending on severity). In a small number of patients, aspiration pneumonia can be fatal. Other complications are break down of the “tie-back” suture and incisional complications such as seroma and abscess/infection. Anesthesia complications can arise with any anesthesia/surgical event, however with proper screening, this risk can be minimized. My feeling is that even dogs prior to a “tie-back” procedure have a higher risk of aspiration pneumonia because the protective mechanism of the larynx is not functioning properly.
Surgically addressing this condition can be life saving and drastically improve the quality of your pets life. Most owners (~90%) are happy they made the decision to proceed forward with surgery and are pleased with the improved quality of life for their pet. If you notice any of these changes to your pet, please plan to see your veterinarian to see if they are a candidate for surgery. While the above article is long, it does not include everything related to this disease, if you have questions, just ask!!!
As Halloween and the upcoming holidays are rapidly approaching, we are often wrapped up in family gathering, parties, and other activities and forget about the well being of our beloved pets. I tried compiling a short list to help keep our pets healthy and out of trouble this holiday season. This should ensure that everyone has a happy holiday season and may save you and your pet from needing emergency trips to veterinarian or emergency clinic.
1. Keep candy away from pets, in particular chocolate and candies made with xylitol and other sweeteners. While these taste good, they can have very harmful effects on your pet, ranging from liver failure, seizures, and as severe as death. If you suspect your pet has consumed any of these, seek veterinary care immediately.
2. Keep a close on the whereabouts of your pets. With all the excitement and increased visitors during this time, make sure your pets are accounted for and haven’t run off. Missing pets and subsequent trauma, such as being hit by a vehicle is an all to common occurrence during this time. Make sure your pets are in a safe place when company is over.
3. Keep pets out of the garbage and from grabbing food off the table. Bones and fatty meats can cause illness in our pets, especially dogs. Bones can cause a lot of irritation and in some cases puncture the gastrointestinal tracts. Fatty foods are not good for our pets and can cause pancreatitis and other gastrointestinal issues. Pancreatitis can range in severity and needs to be treated by your veterinarian.
4. Keep cords and electrical wiring away from your pets. Both cats and dogs can find wires enticing. Electrocution injury can be very severe and cause death in some cases. If you believe your pet to have be electrocuted, have them evaluated by your veterinarian immediately.
5. Keep easily ingestible objects away from your pets. Objects that can be easily swallowed can cause gastrointestinal irritation and obstruction. Some objects that can become obstructive are clothes, small toys, tinsel, etc. Gastrointestinal obstructions demand immediate veterinary care. There are times when the object can pass, but most of the time your pet will need surgery to relieve the obstruction, Surgery can range from a single incision in the stomach to removal of a segment of intestine. In extreme cases this condition can be fatal.
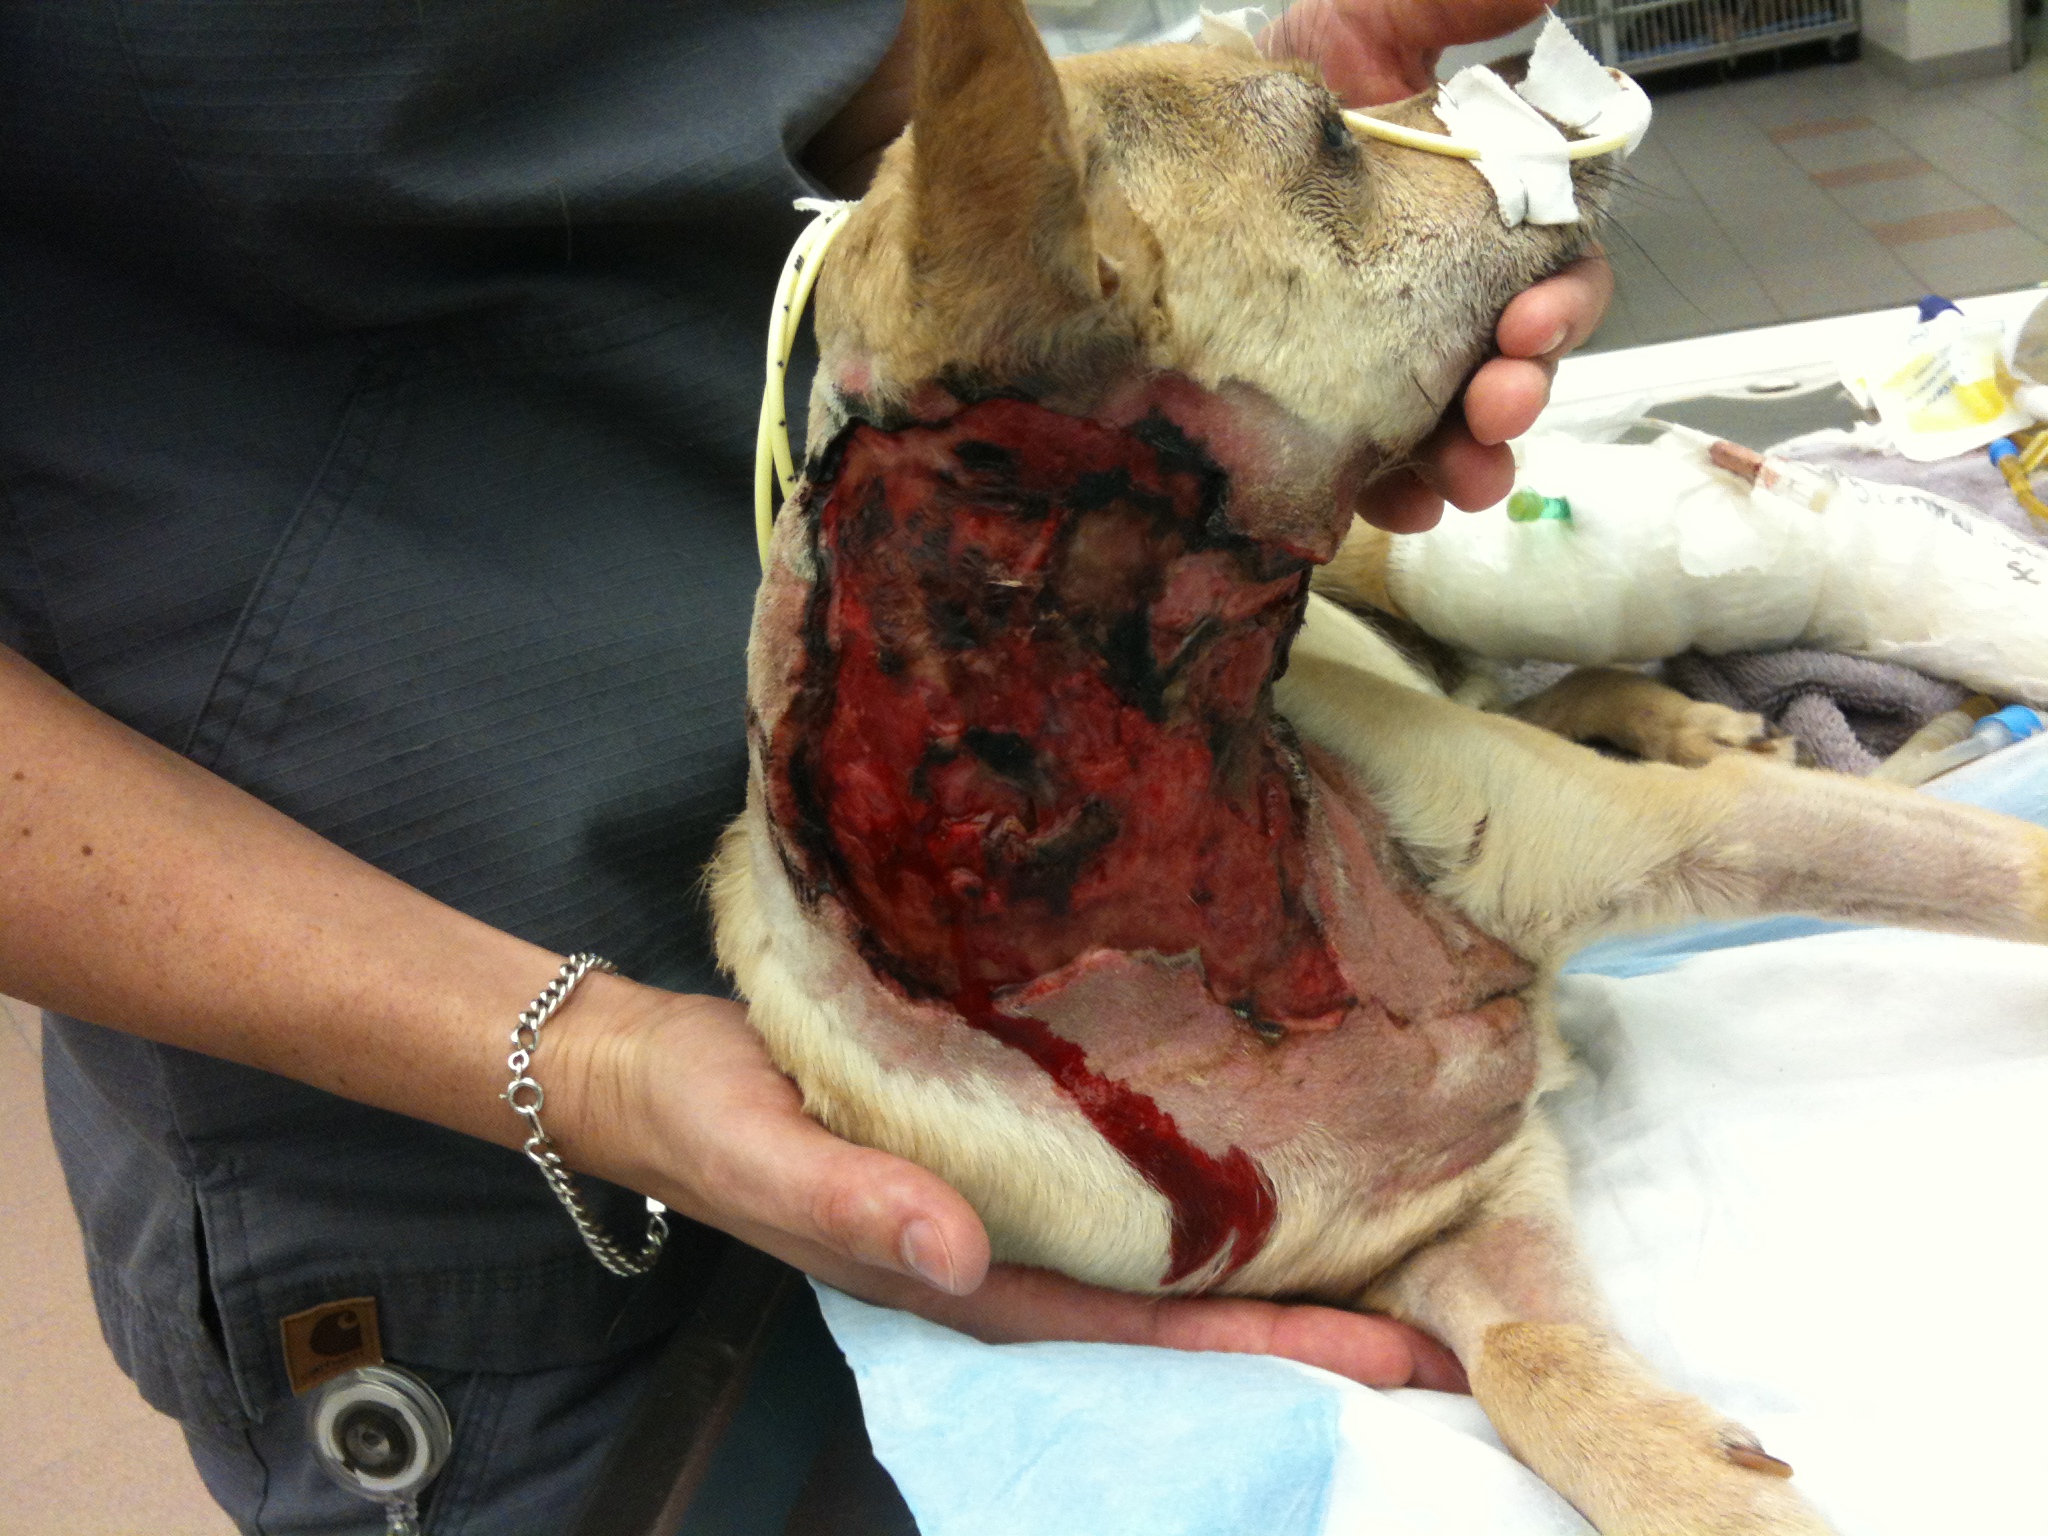
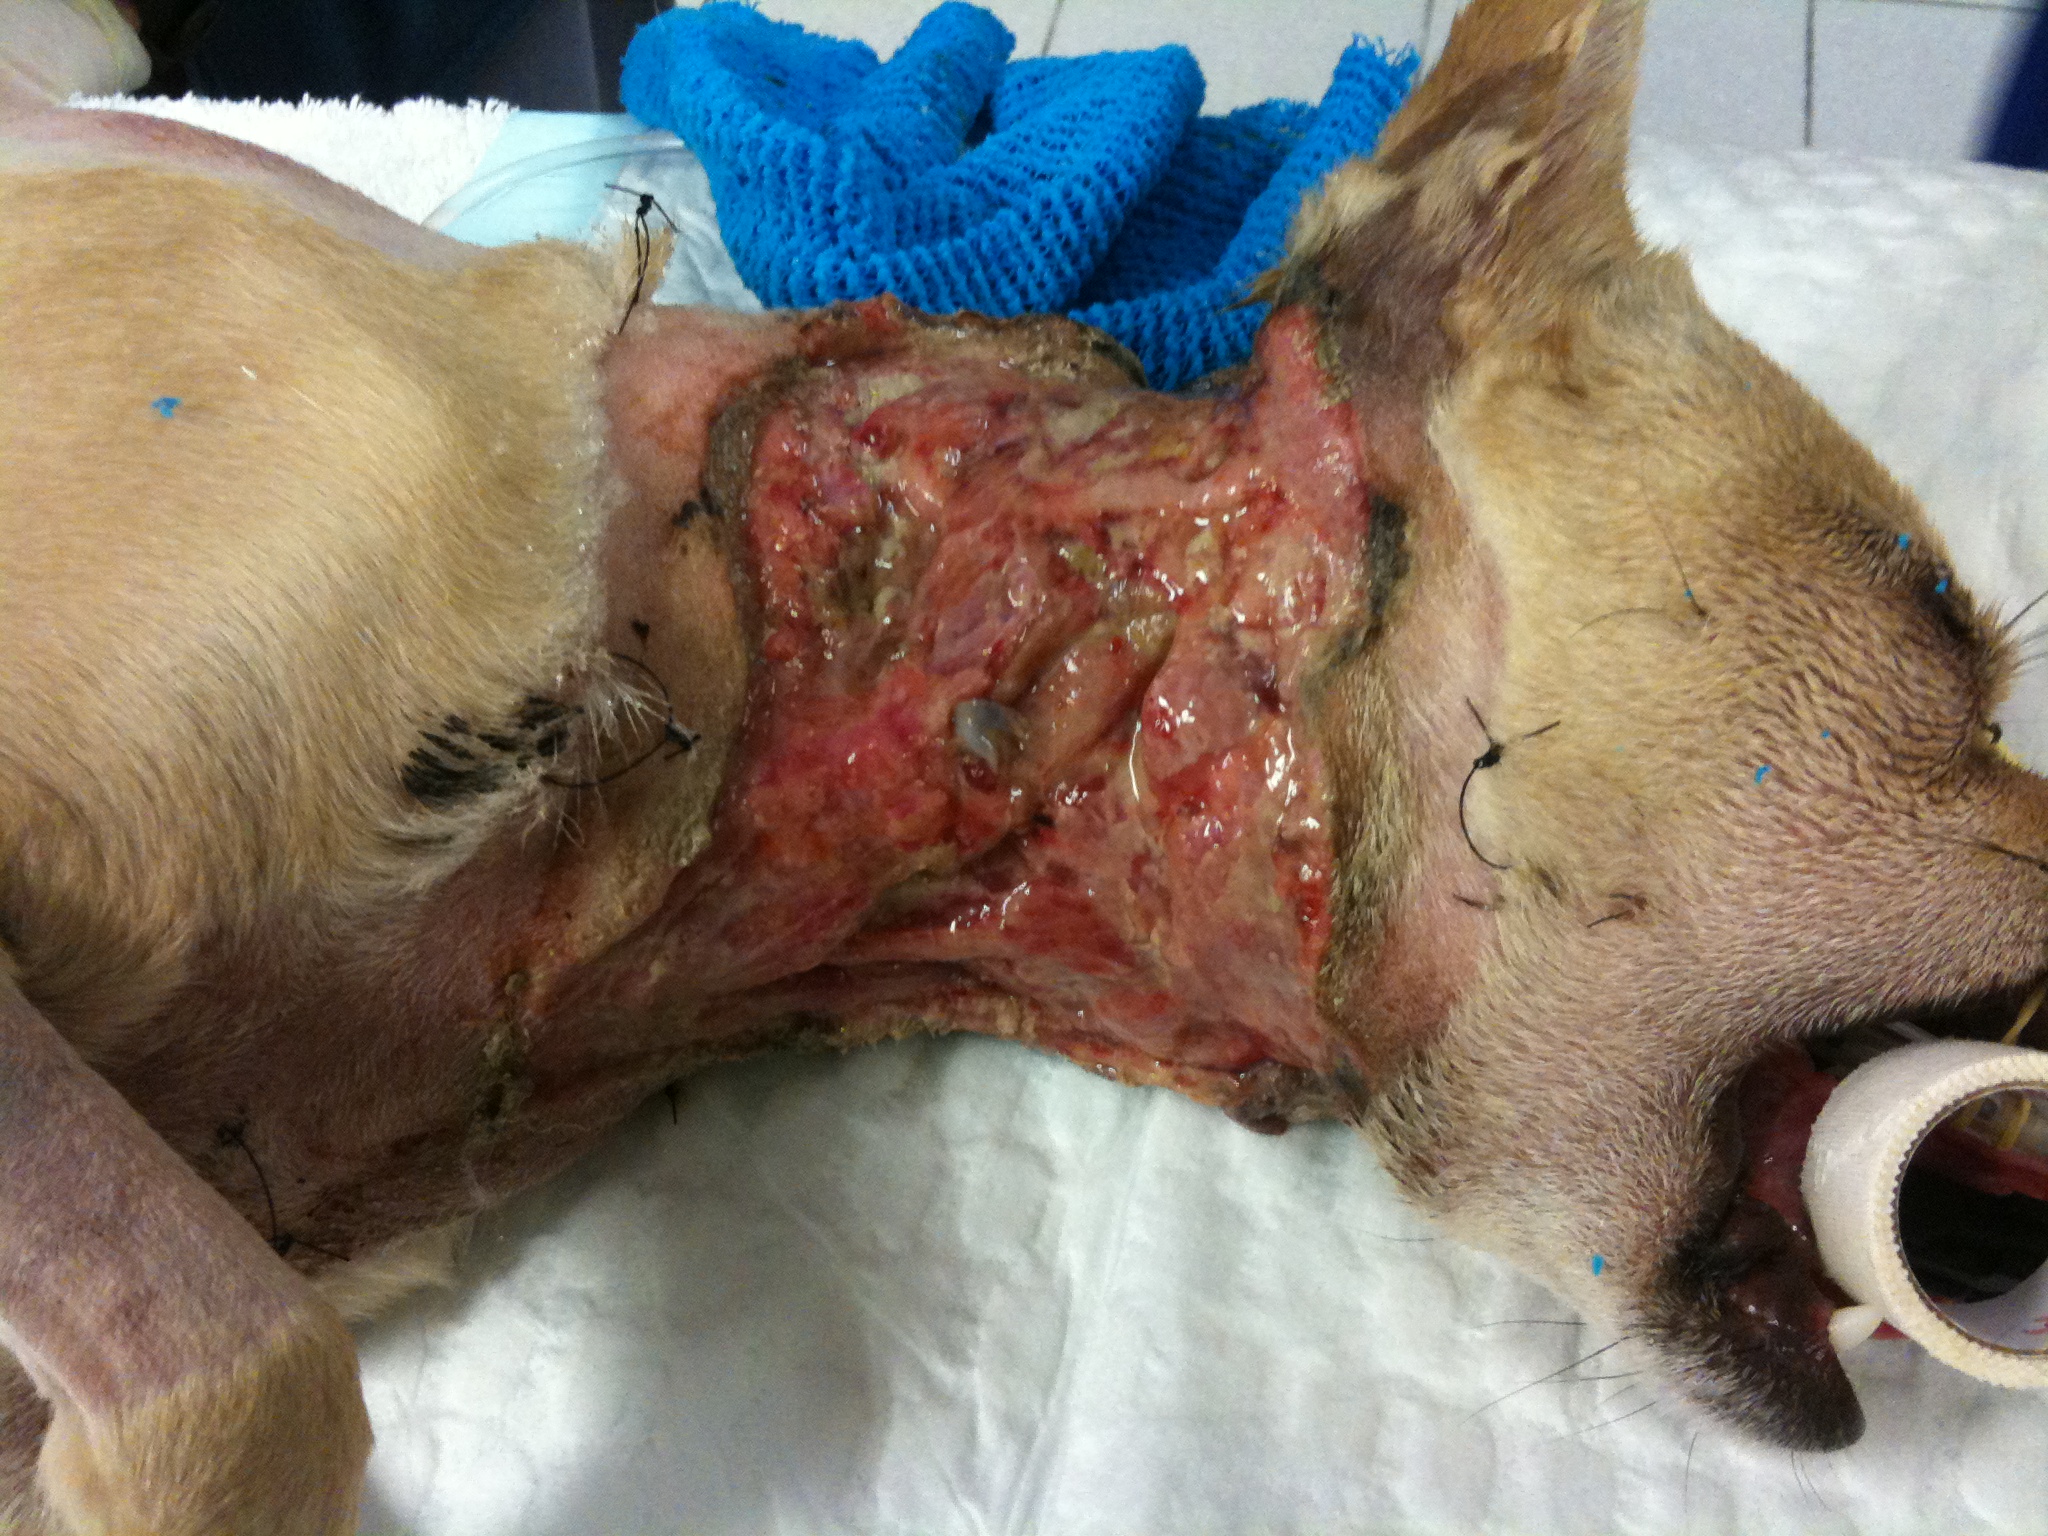
October’s case of the month is an interesting one. Lucky is a young chihuahua mix that came to us with SEVERE injuries. He was attacked by a neighborhood dog about 7 days before presenting to us and was in very bad shape. His initial wounds were managed, but unfortunately infection still set in and the majority of his cervical (neck) skin started to die and needed to be removed. Not only was the infection causing a problem locally, but we had signs of it being spread systemically (through his blood stream). He needed both surgical care and care by a criticalist(board certified in Emergency and Critical Care) in order for him to have a fighting chance. Below is a picture of what he looked like when he was admitted into the hospital.
This was Lucky as he was admitted to the hospital.
You can make out the extensive injuries on the photo above. He was fortunate to be alive! Whenever we get a case like this (unfortunately it happens more frequently than we like), we am always realistic with the owners, because there is a chance that their pet will not survive. Also, these cases are not quick cases, Lucky was hospitalized for 2-3 weeks and wasn’t fully healed for about 6 weeks. Our first objective is to get the systemic infection under control and get him strong enough to be able to handle surgery. While the criticalist was working on the systemic infection, we were concentrating on the neck wound.
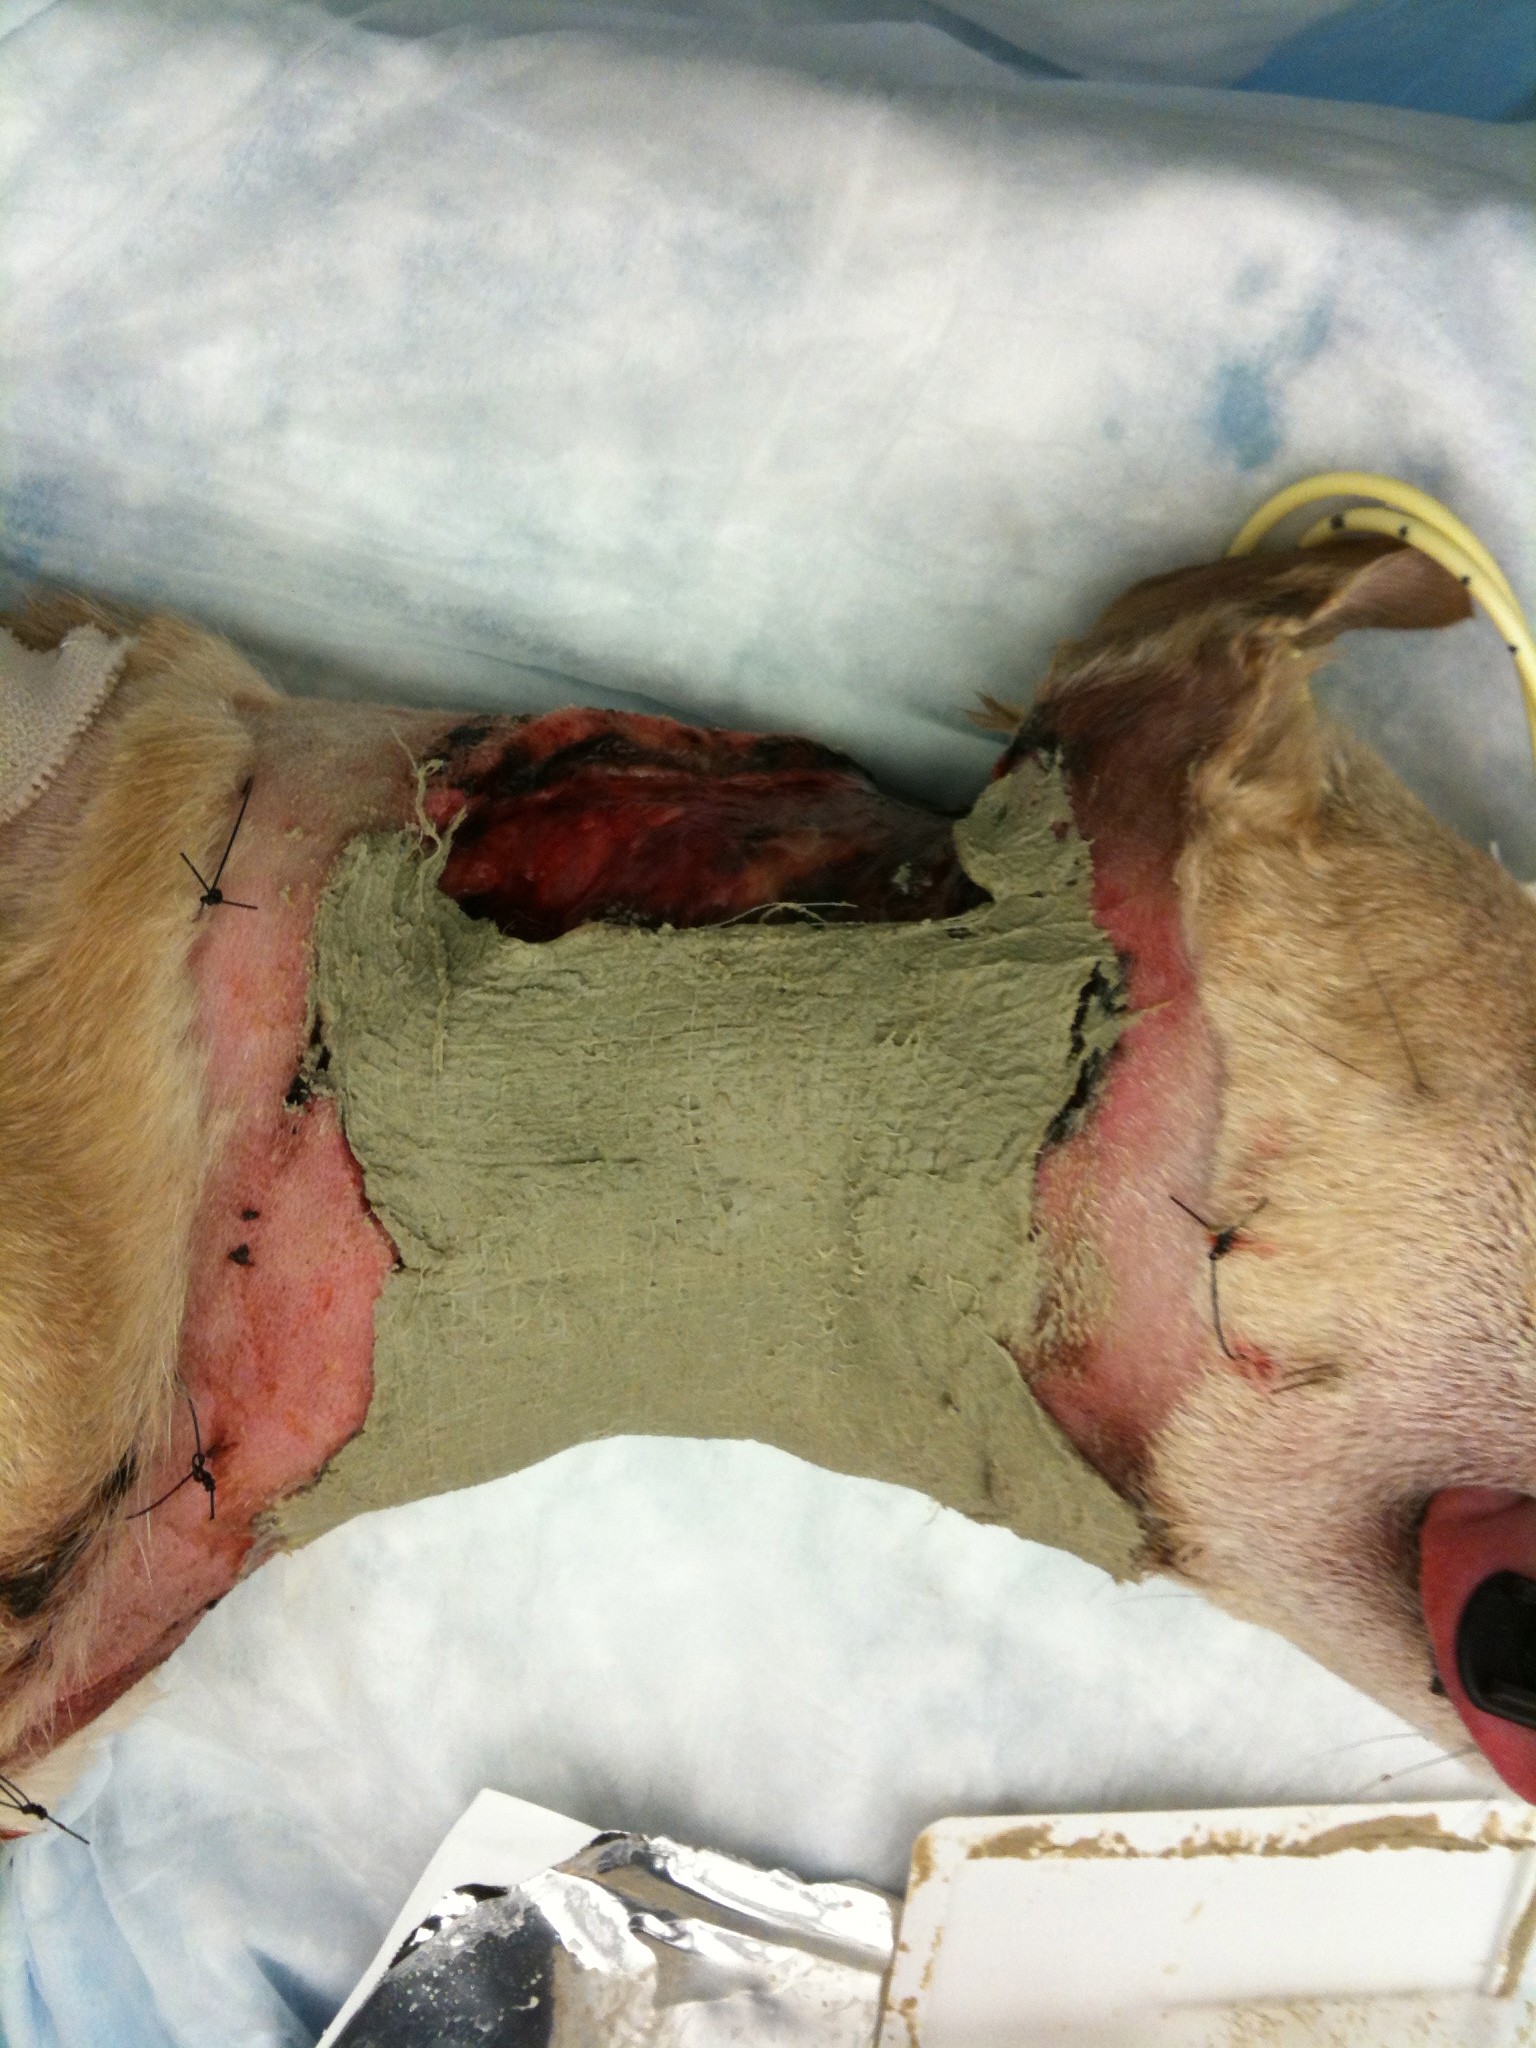
The first phase wounds go through is the debridement phase, which is where the body gets rid of necrotic (dead) tissue and the size of the wound is established. The next phase to follow is the granulation phase. The granulation phase is very important in a large wound like this, this is when the body begins to infiltrate the wound with healthy tissue and more importantly capillary vessels, which bring blood flow. For this wound, I choose to use a wound dressing called BurnStat (Ubuntu) which is a dressing that can be used through multiple phases. It is an organic clay substrate that does an excellent job of removing toxins and necrotic tissue while promoting granulation tissue formation.
Debridement phase
Applying BurnStat as the primary wound dressing
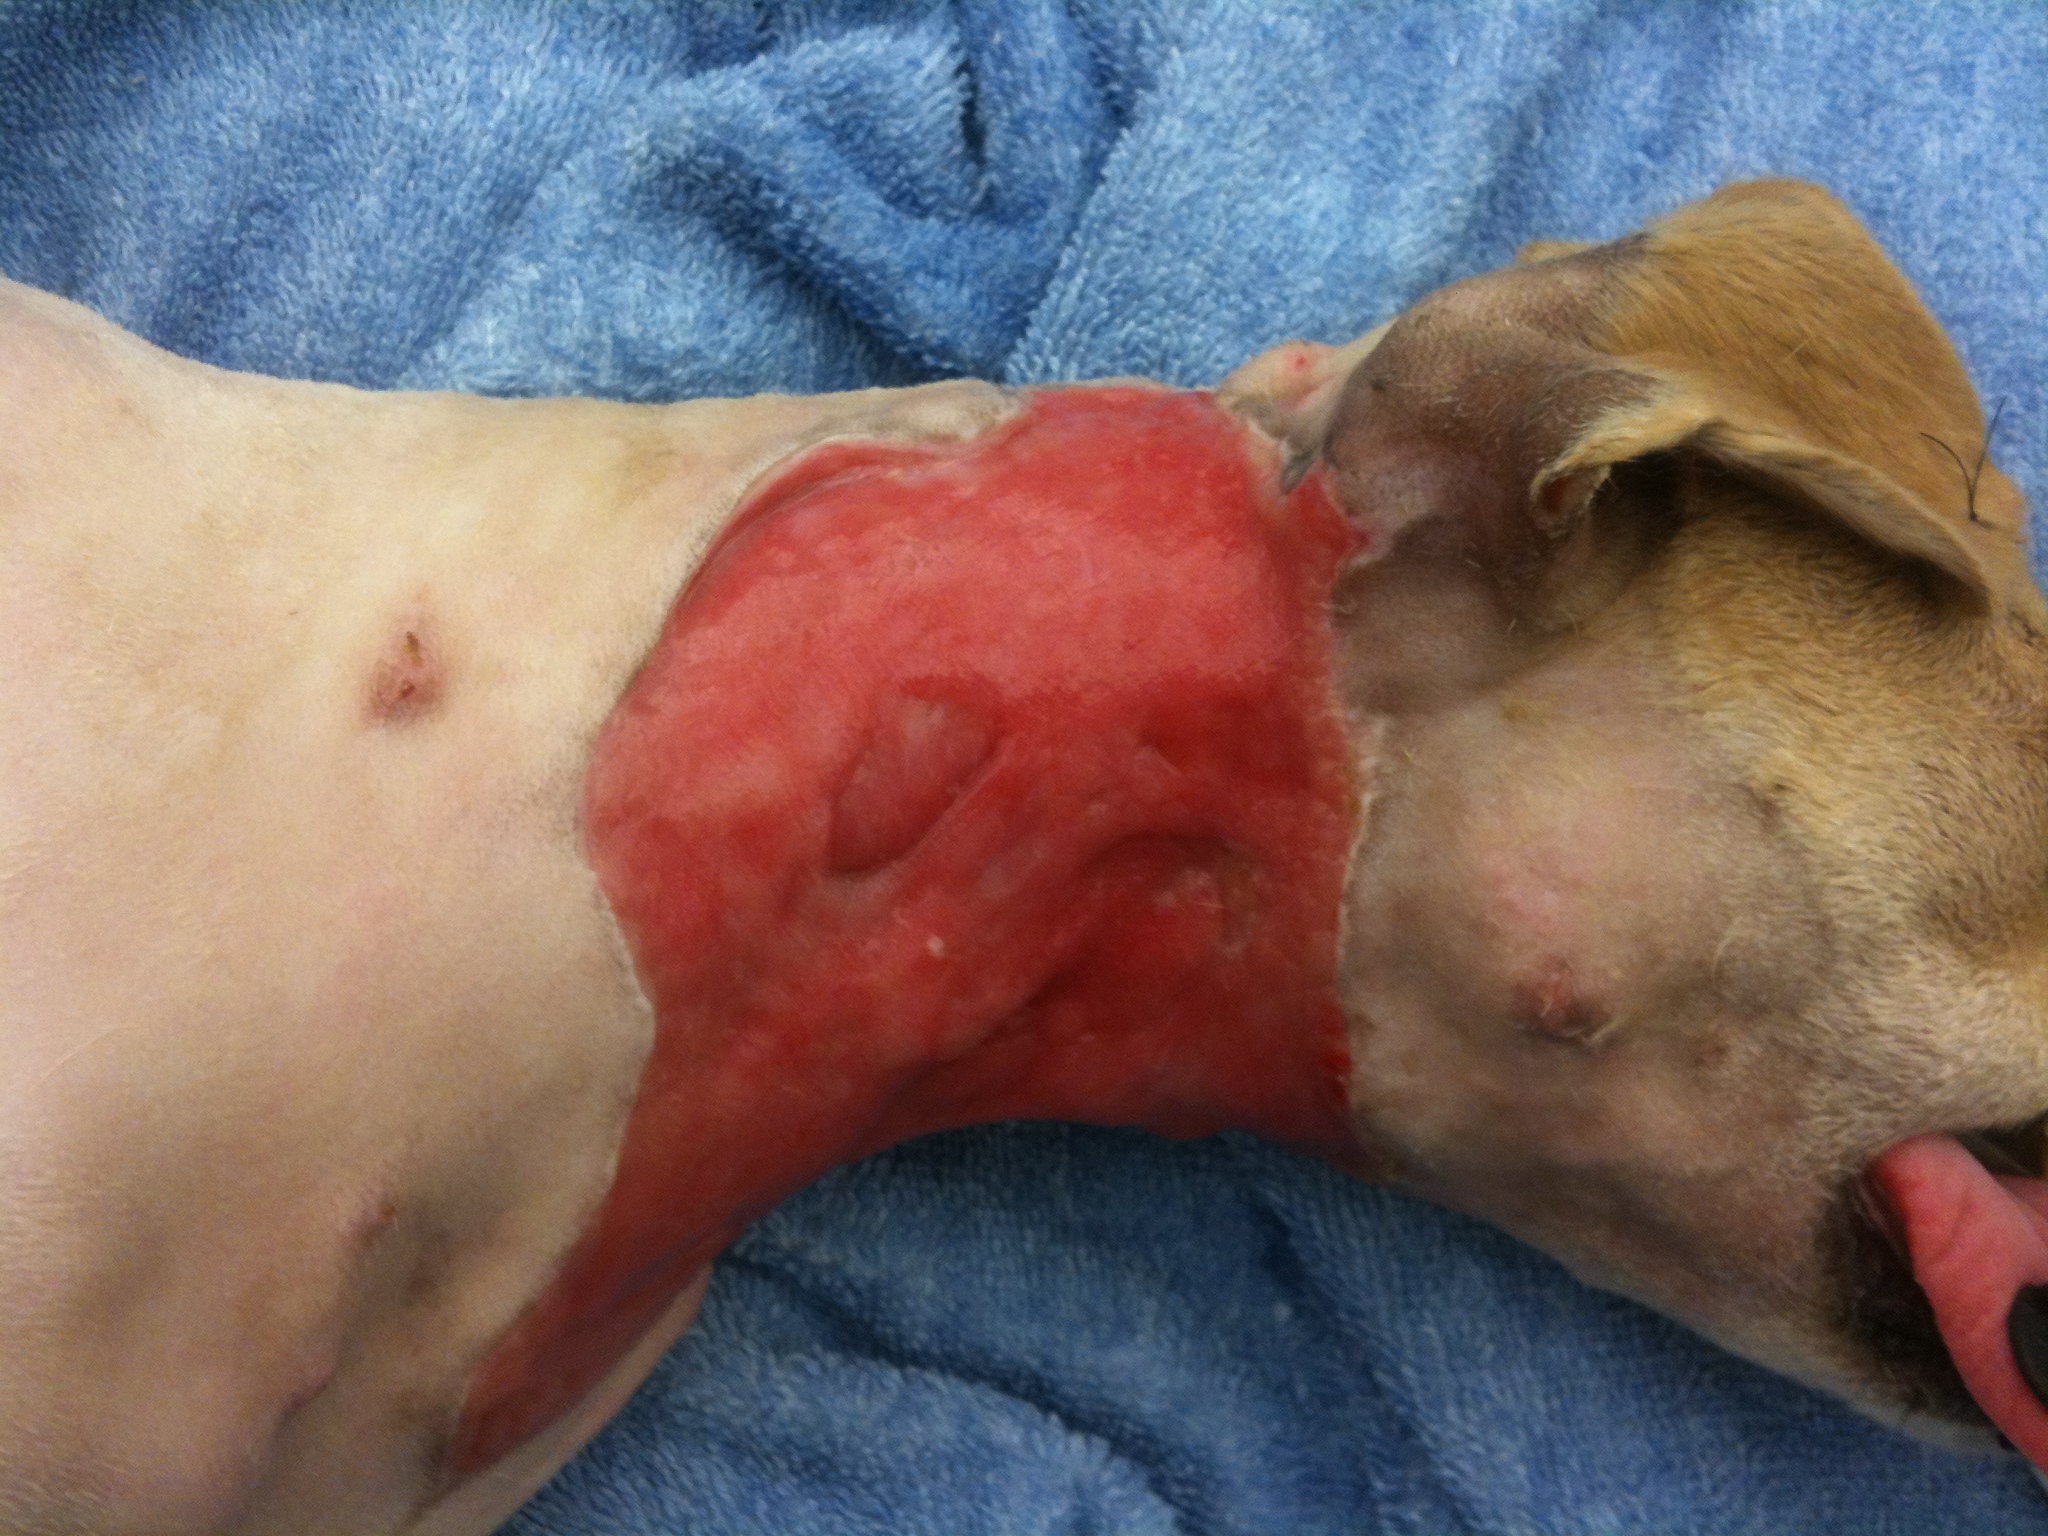
Following this type of bandaging, the diseased tissue begins to be replaced with more healthy, red granulation tissue. The final product, before being able to close the wound, needs to be completely covered with granulation tissue in order to increase the chance of the new skin being accepted.
Complete coverage by granulation tissue.
You can see how the surface is covered with healthy looking tissue and no presence of dying tissue visible. By this time Lucky amazingly over came his battle with the widespread infection and overall was doing very well. He was making a remarkable recovery.
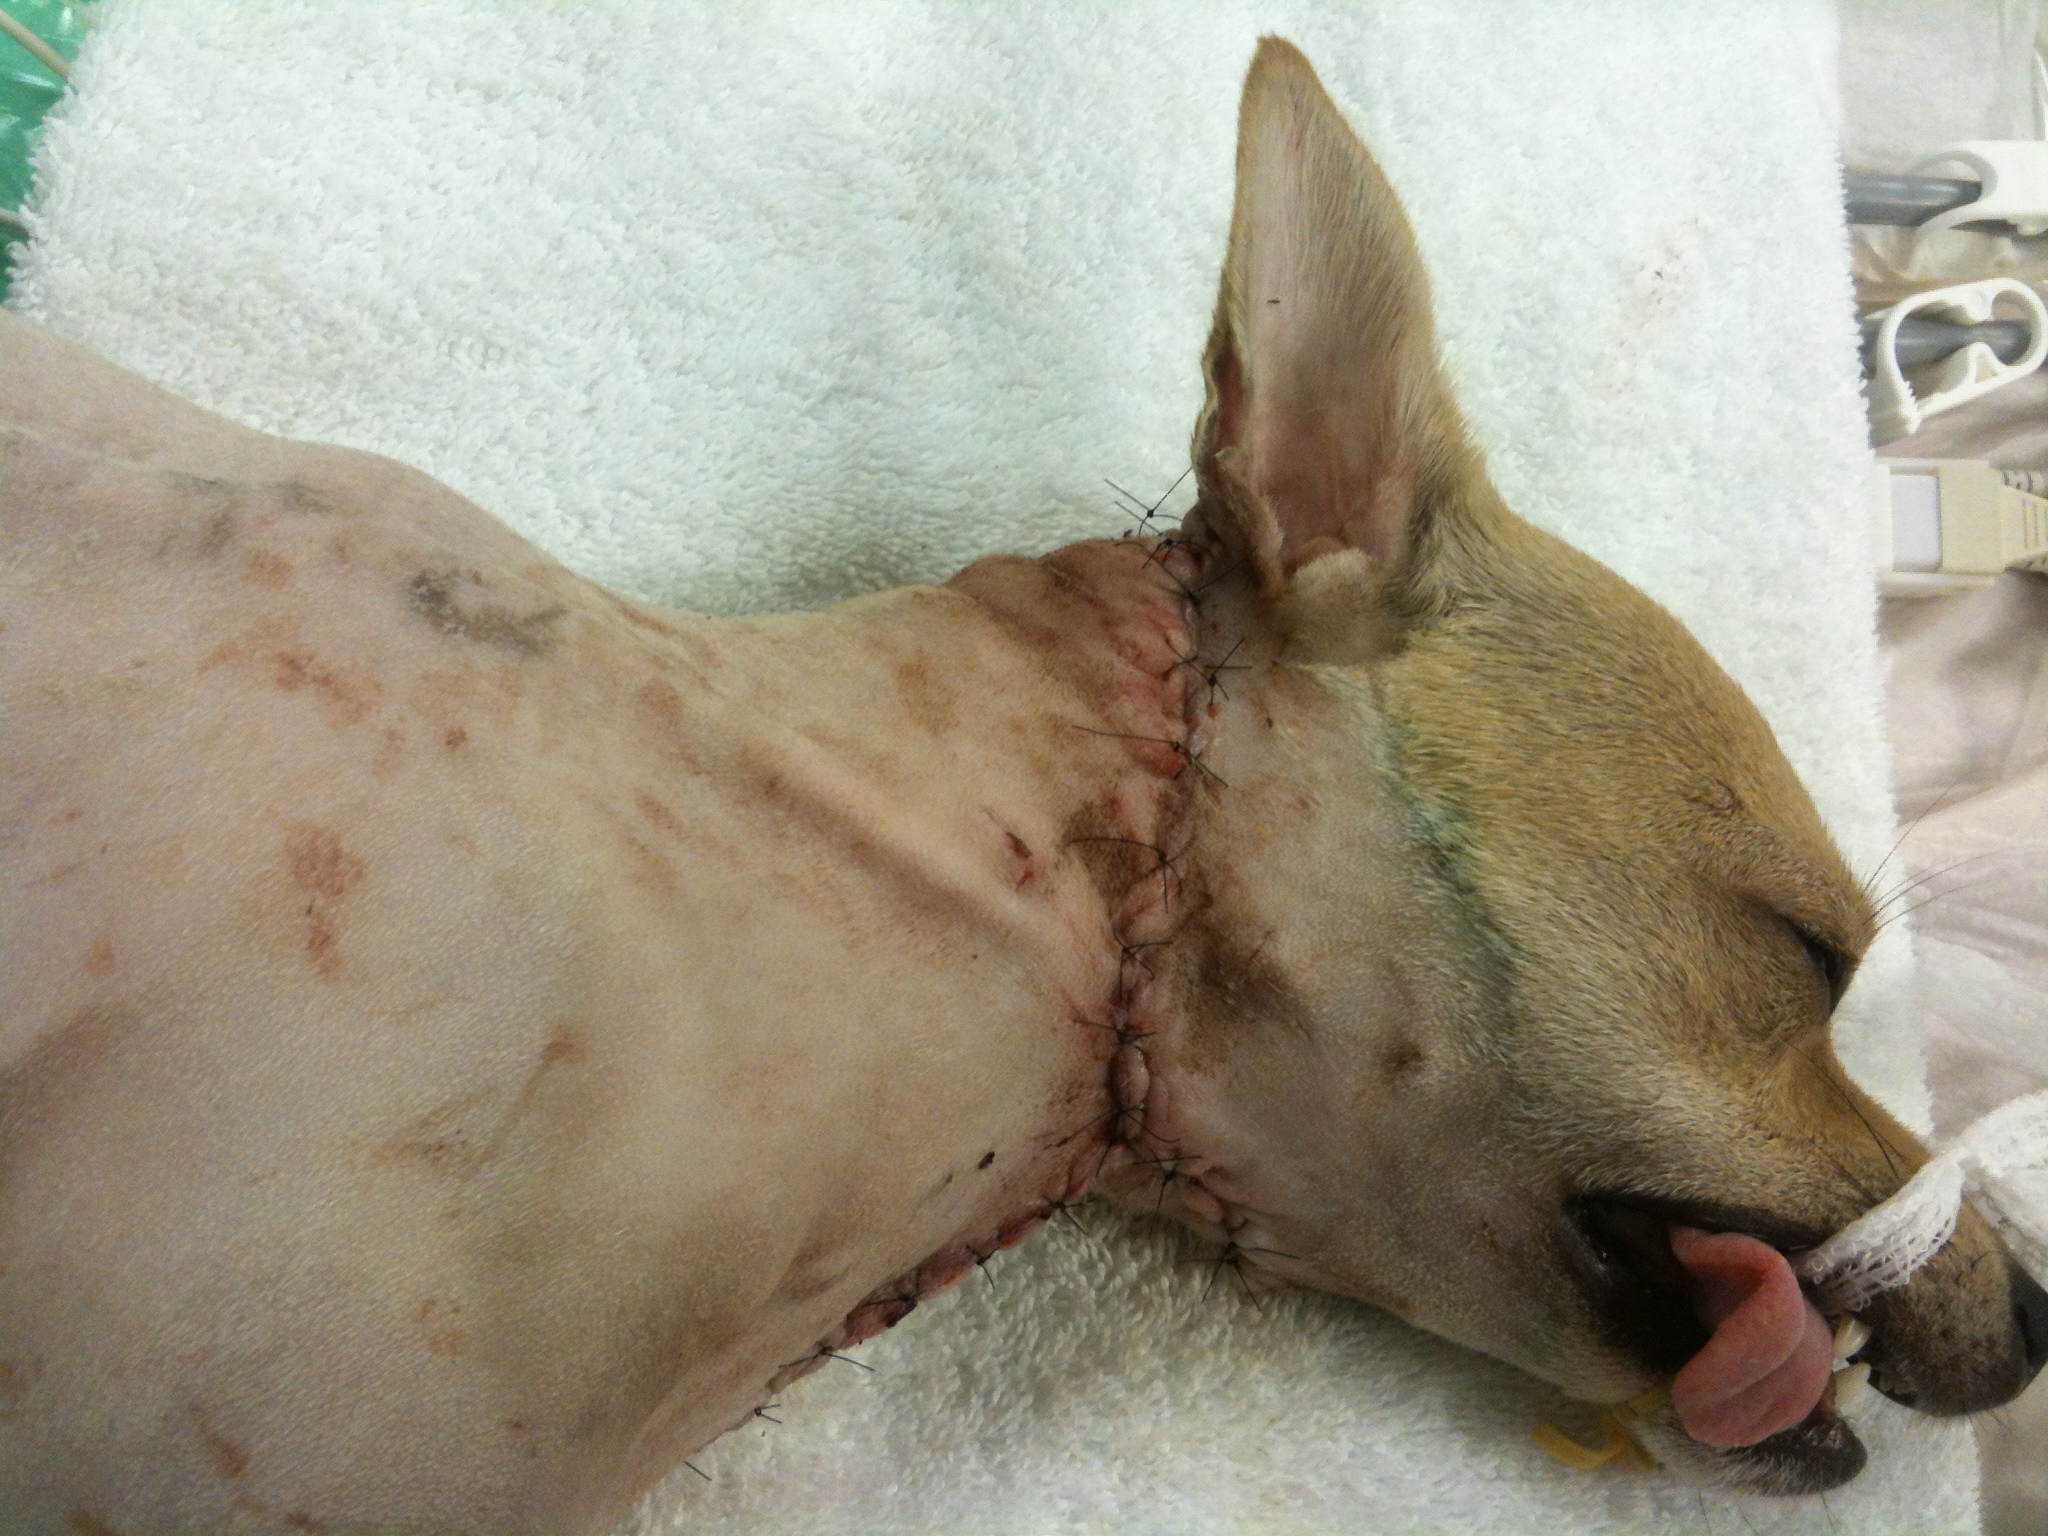
Our next dilemma was “how do we cover the exposed tissue”? In cases like this, we have a few options, which is beyond the scope of this post. I choose to use an advancement flap (skin freed up from a nearby location that is moved over the wound), which made the most sense due to the elasticity of the skin in this area. Below is his wound following surgery.
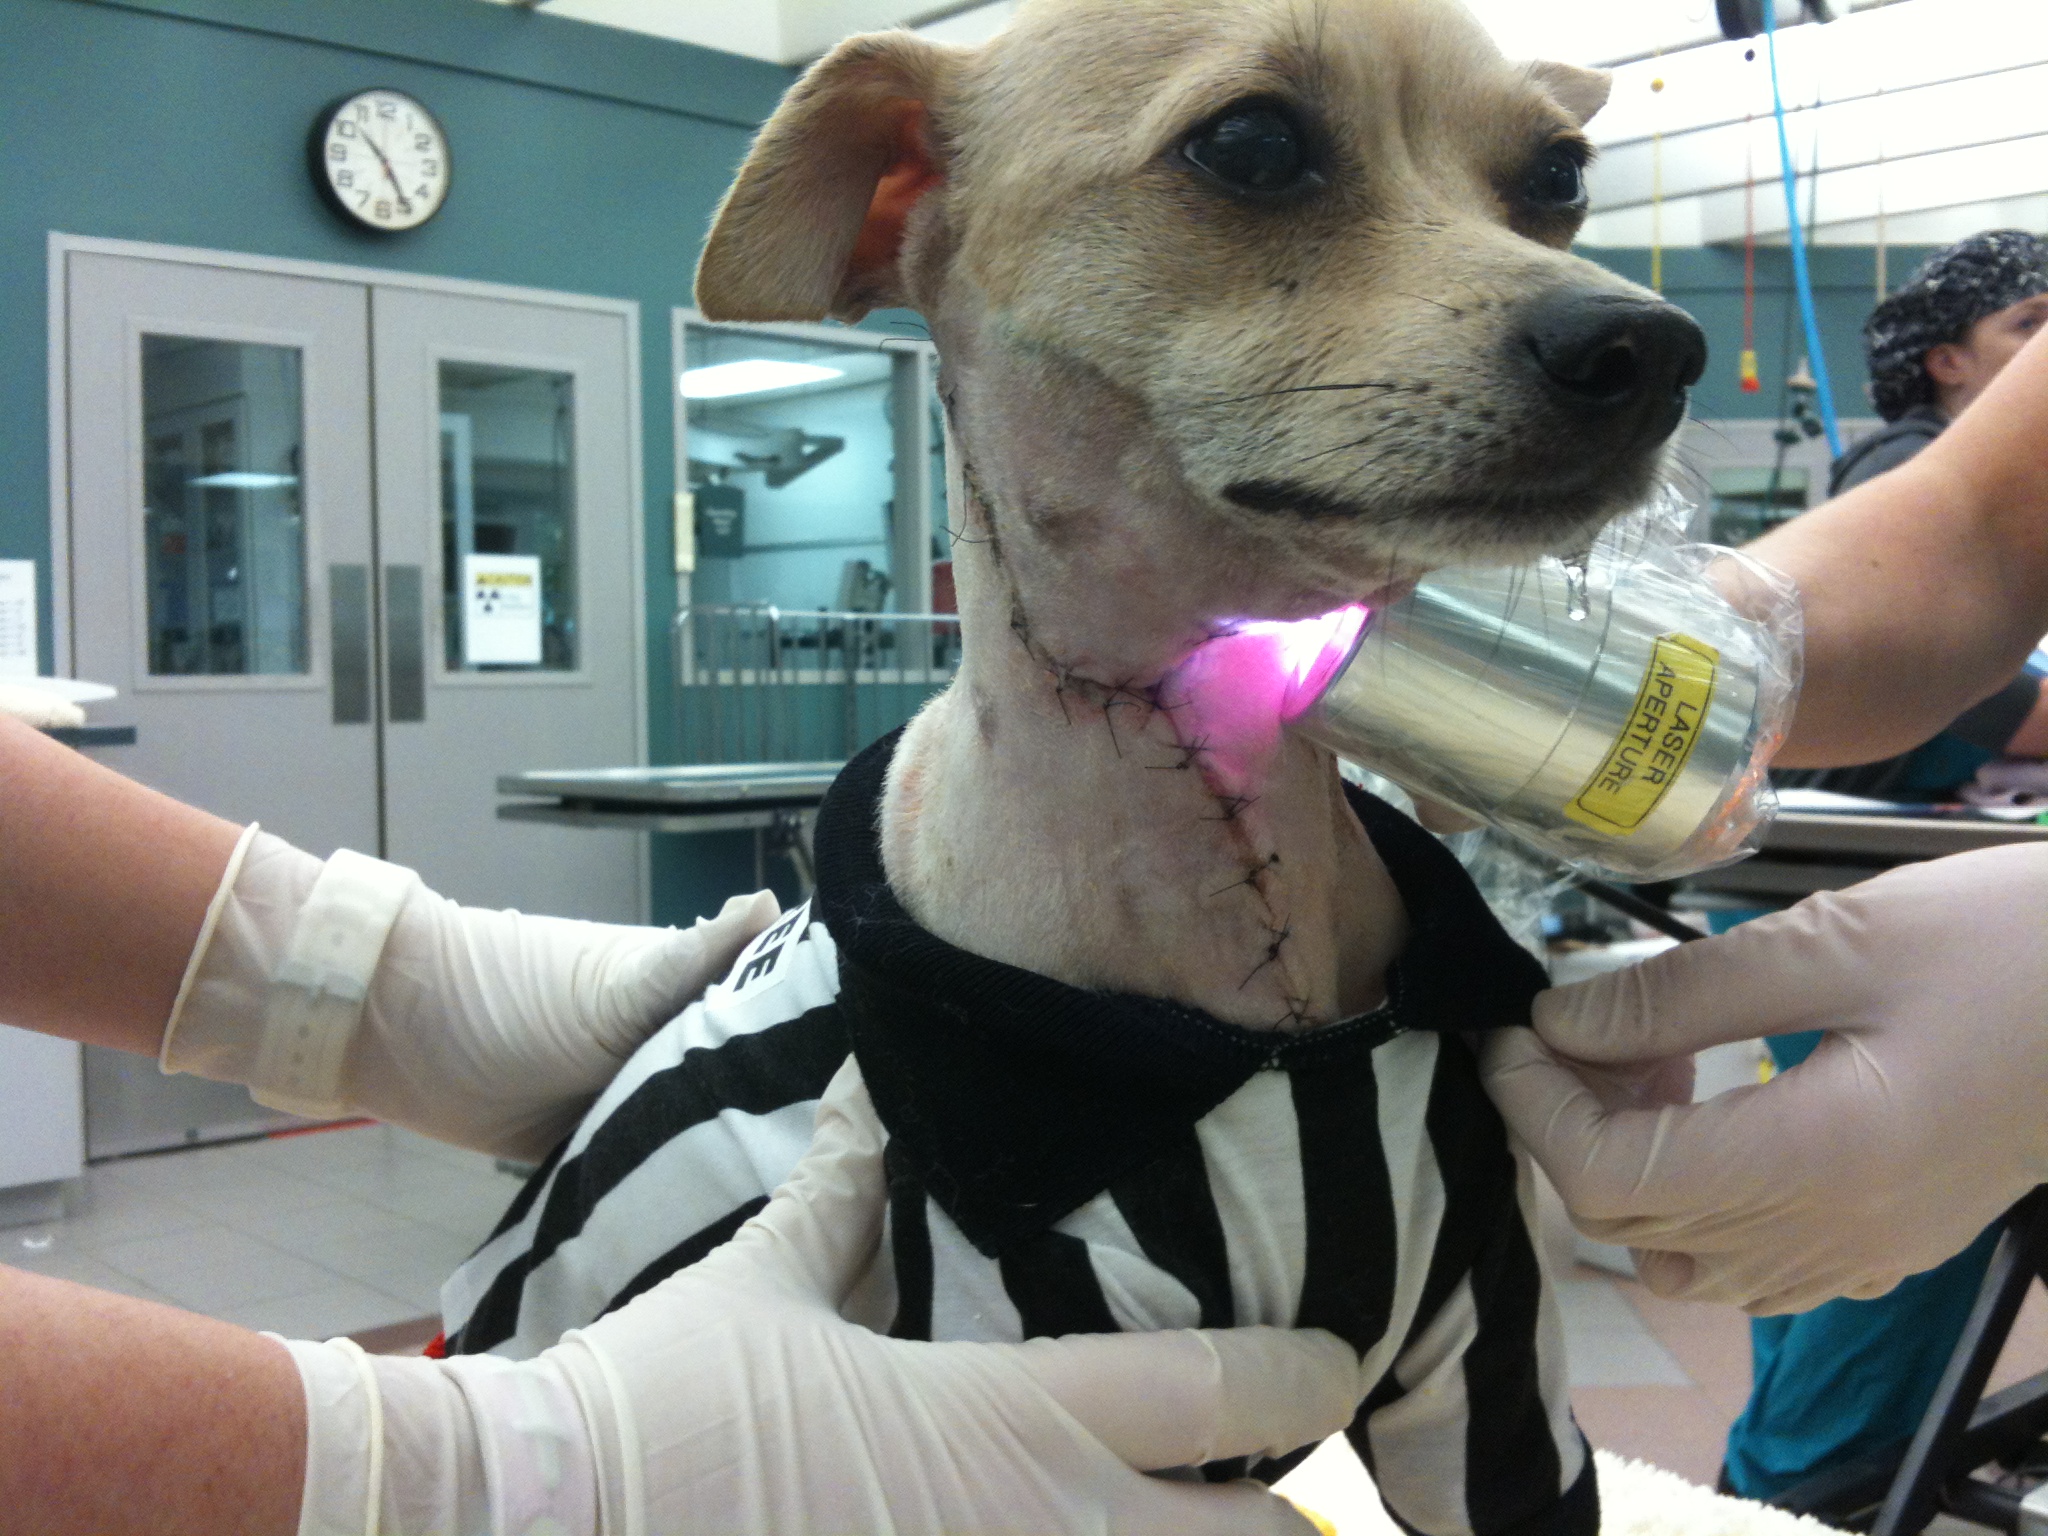
Advancement flap
Following surgery we also utilized laser therapy to help promote uptake of the skin flap. This is Lucky in his referee uniform (it is close to Halloween) receiving his laser therapy.
Post-advancement flap therapy
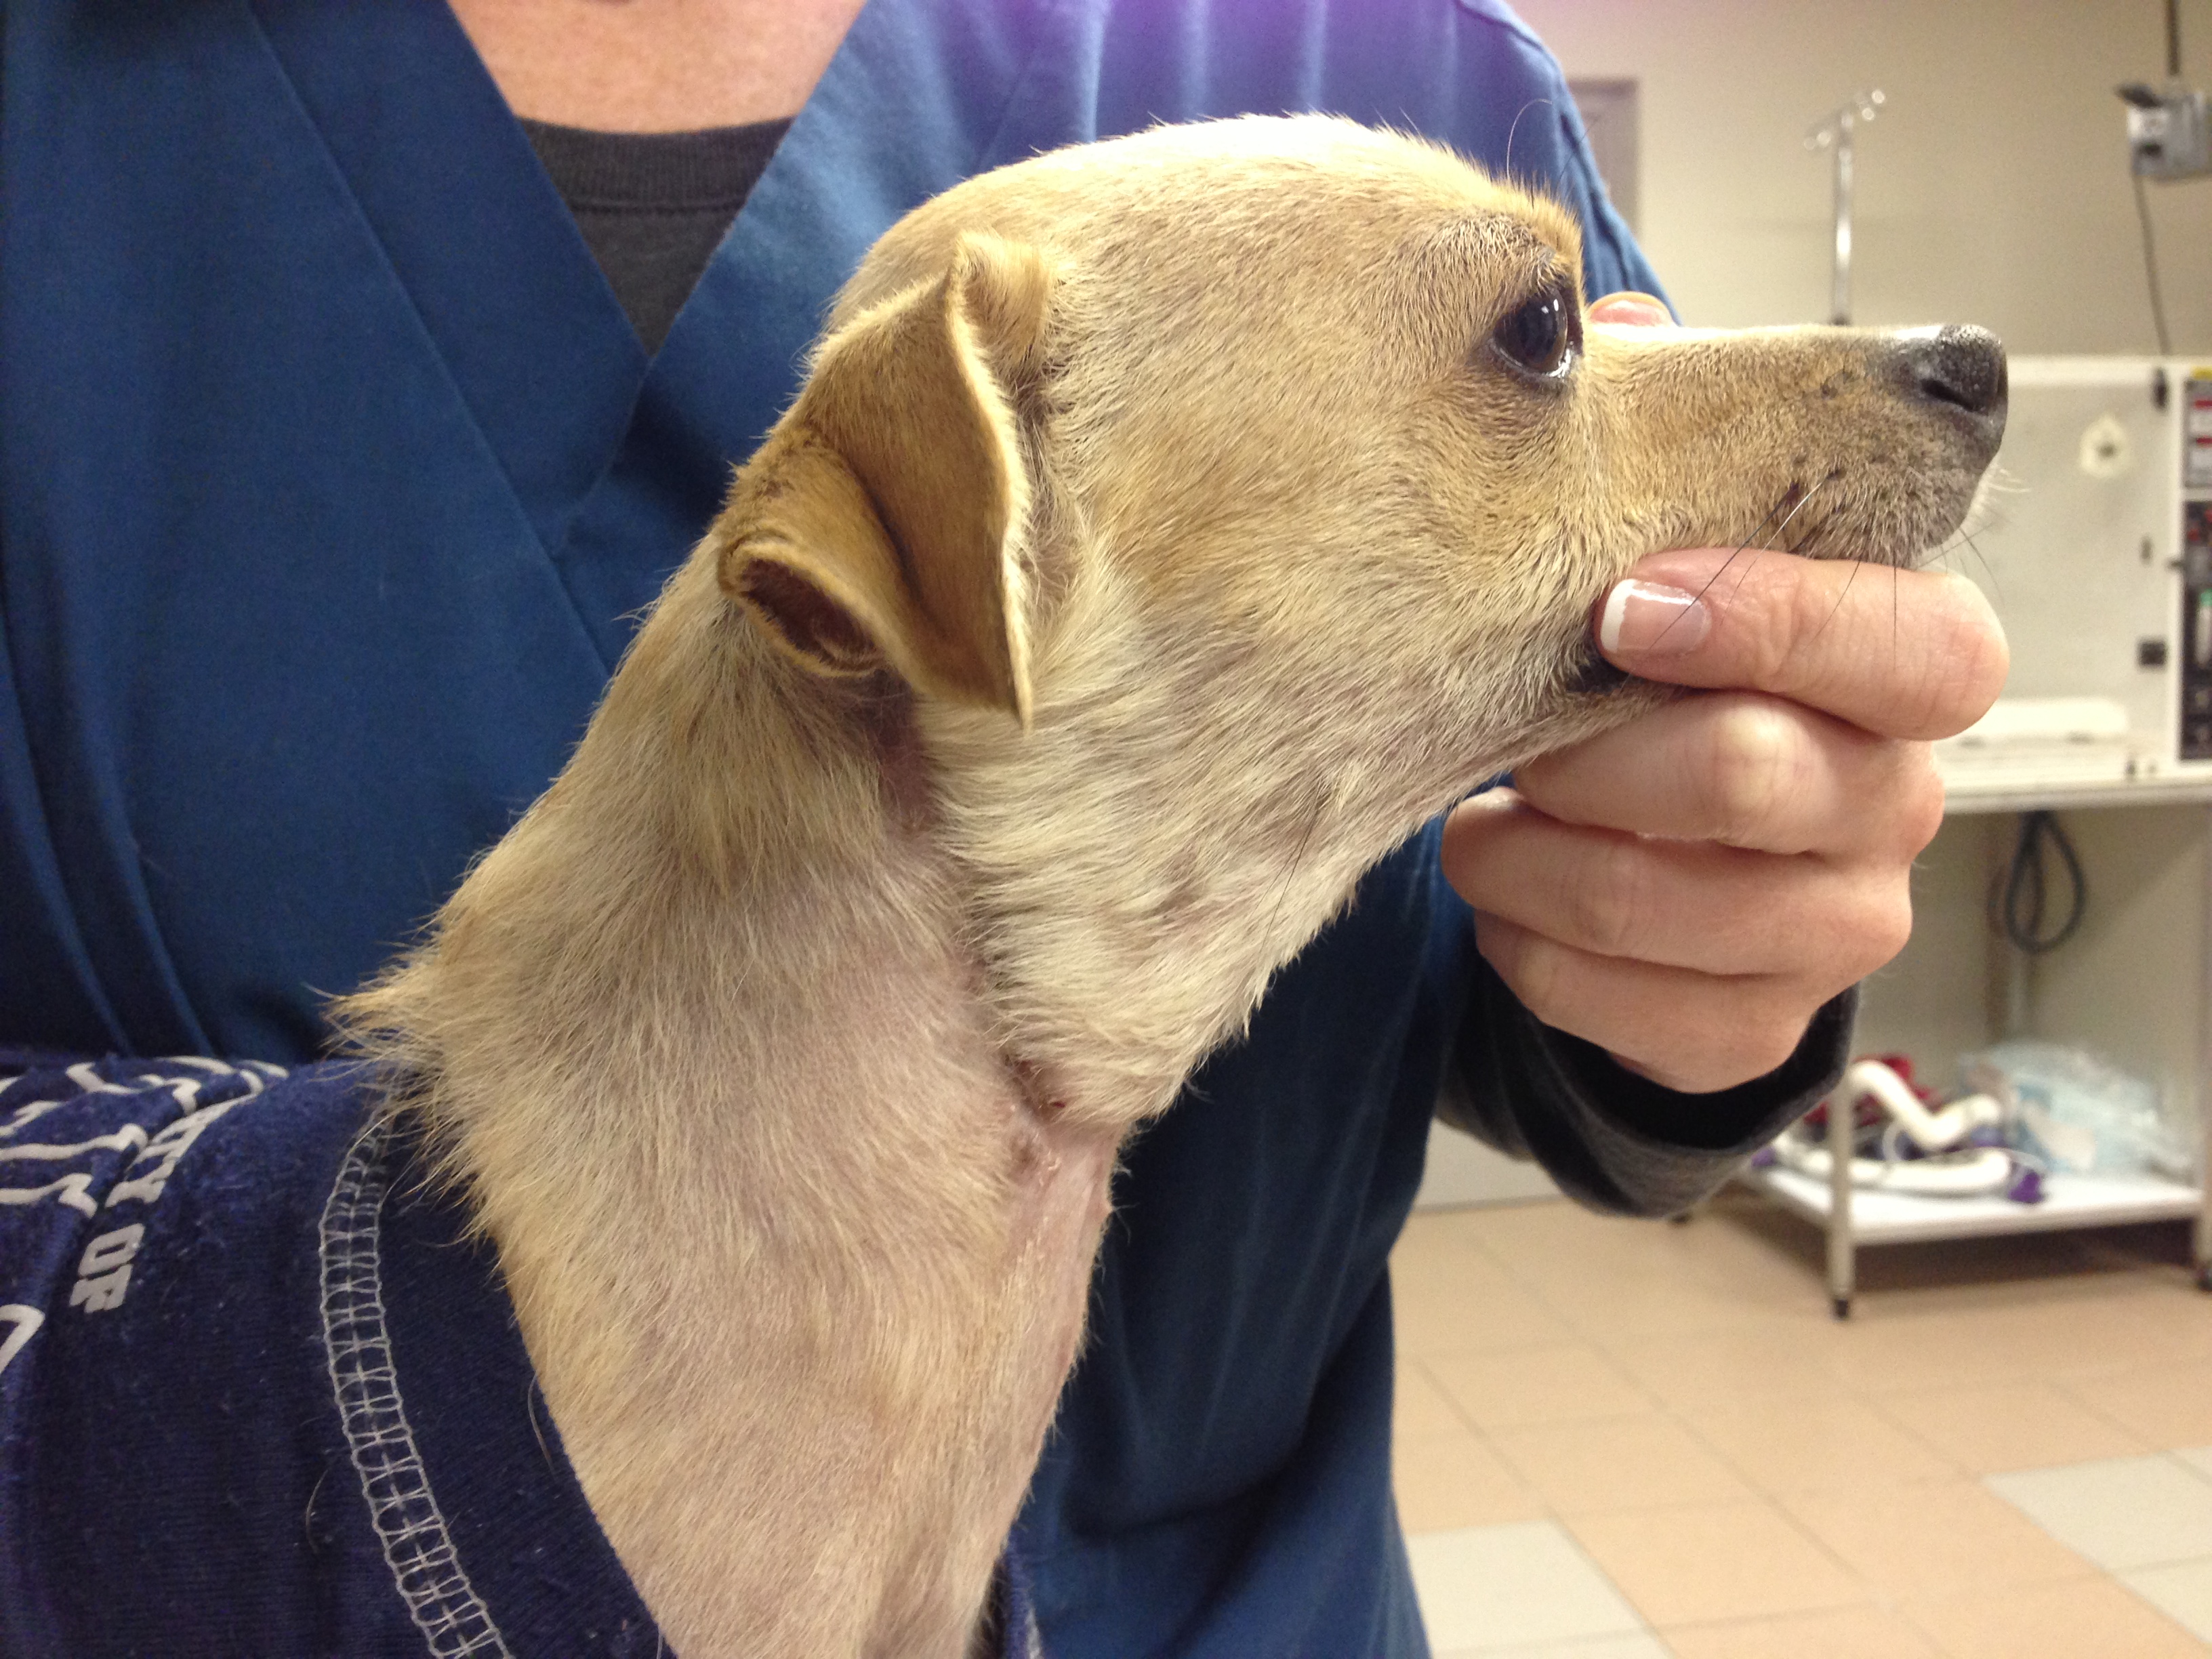
Here is the finished product for Lucky!!! He overcame a lot of obstacles along the way!!
Sometimes it can be very hard to determine which leg your pet (or patient) is limping on, let alone which joint is causing the problem. I want to take a little time to discuss a problem that we see from time to time that typically affects the juvenile (6-18 month), medium and large breed dog and is typically thought of as a congenital/hereditary issue. The most note worthy joints affected are the shoulder (proximal humerus), the elbow (distal humerus), stifle (distal femur), and hock (talus).
The underlying etiology is similar in all the joints, however this article will focus on the shoulder with subsequent articles dealing with the other joints. I think this approach is reasonable because the treatment may be different for other joints,as well as, the prognosis can vary. Again, this disease affects primarily young dogs; in the older patients we usually see the consequence of this issue, resulting in osteoarthritis of the joint.
Osteochondrosis (OC) precedes osteochondritis dissecans (OCD) and is characterized by a problem between the metaphyseal growth plates of the affected bone and the cartilage. In essence, the cartilage surface does not adhere to the underlying subchondral bone surface. When a cleft or break develops in this “soft” cartilage, this fulfills the term OCD. Once the area progresses to an OCD lesion (a break in the cartilage develops), then the patient becomes clinically lame and will exhibit a degree of lameness/limping. Once a flap/break develops there is no known healing that occurs and the abnormal area will continue to incite inflammation within the joint.
There are multiple suspected causes of this issue in the dog, with the most reasonable explanation being that of a congenital/hereditary cause. There is some support of other predisposing factors that may enhance the genetic expression of this disease such as juvenile obesity and imbalances in calcium intake.
Patients with this type of condition will usually be within 6-18 months of age and have a varying level of lameness on one or both front legs. An owner may also see more limping/lameness after strenuous activity or rising from rest.
Physical examination of the suspected patient usually will direct us in the right direction. A thorough gait evaluation is needed to identify which leg or if both front legs are affected. There are certain techniques that can be used to detect which leg is the culprit even with a mild lameness. If your dog is “off and on” lame, it is always helpful to the veterinarian for the owner to bring in video of the patient when he is limping, to help improve our chances of diagnosing your pet correctly. The next step in the evaluation is direct palpation of the leg starting from the digits, working up to the neck. It is very important that care is taken at each joint and long bone on evaluation, since shoulder OCD is not the only cause for limping in the young dog. Typically, discomfort will be elicited on manipulation of the affected shoulder(s) and especially on hyperflexion and hyperextension of the joint. The next step is diagnostic tests.
Radiographs (X-rays)
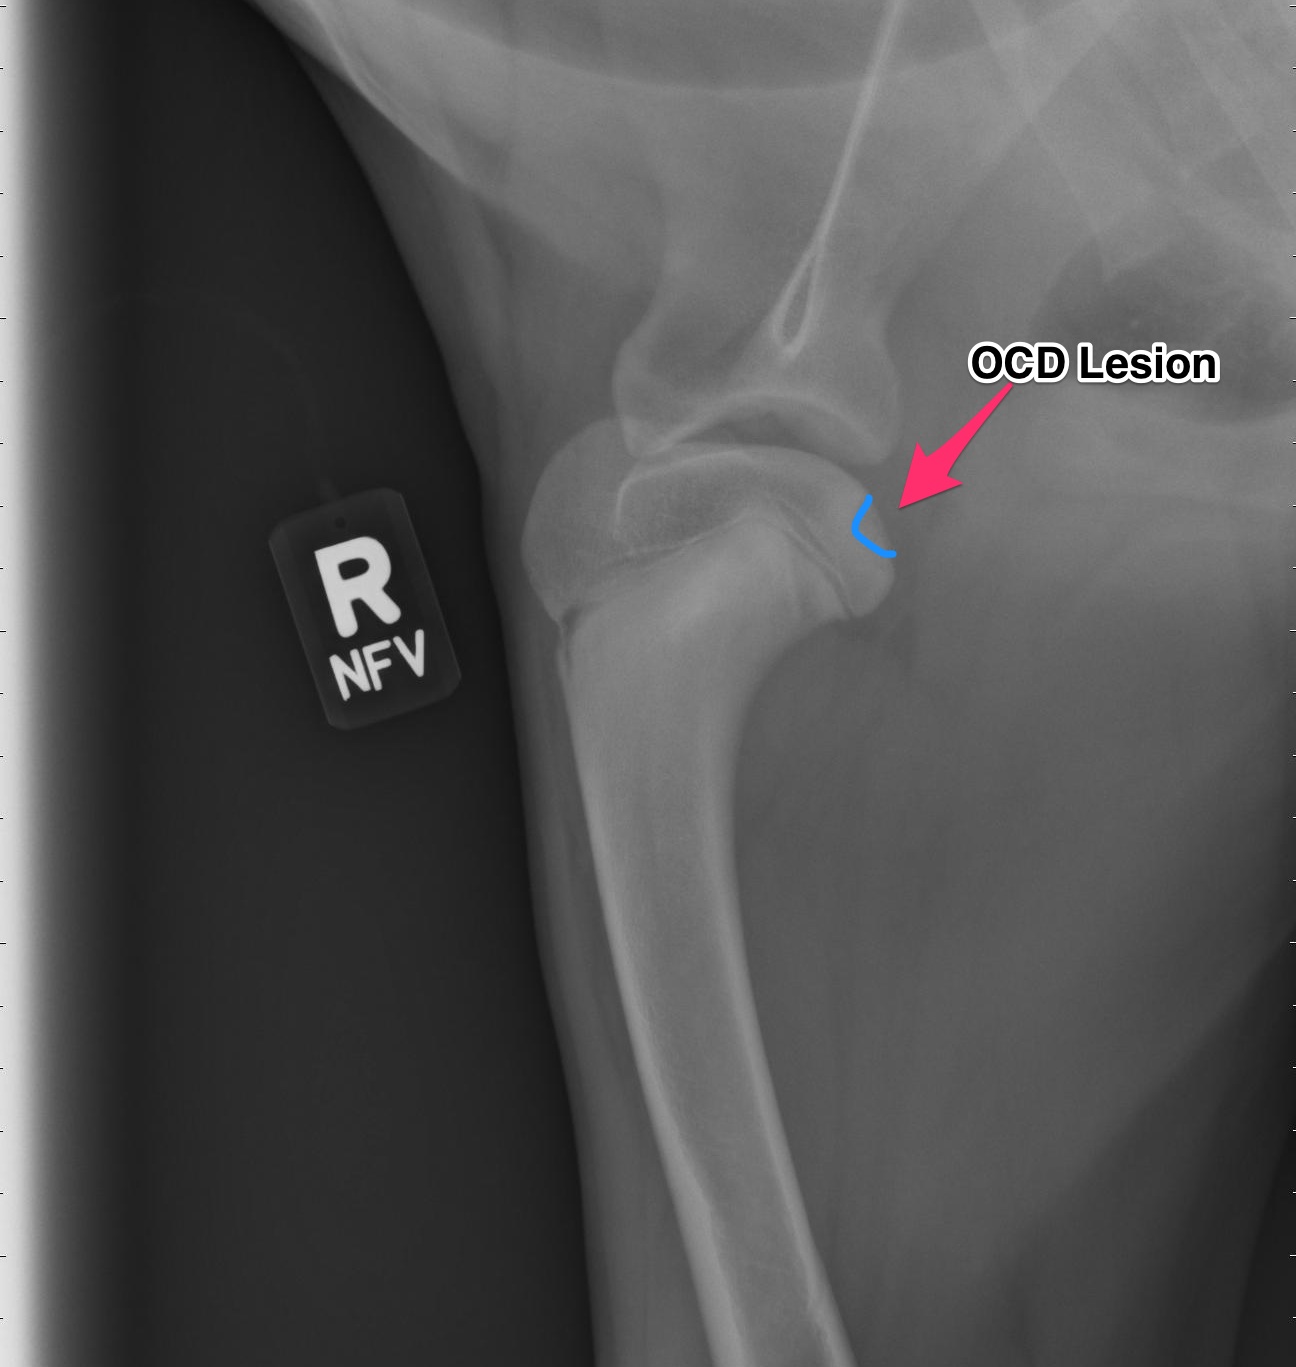
Above are x-rays of a left and right shoulder affected with OCD lesions. These are on the same patient. The images labeled with the left (L) marker has a flattened region noted by the arrow which is characteristic of OCD. The image on the right has the area highlighted in blue. While the lesion doesn’t look big, it can definitely cause a lot of pain and discomfort.
Another way to diagnostically evaluate the joint is with a computed tomography (CT) scan. This will give more detail into the region of interest. Generally this is not needed, however indications for it may be to evaluate the elbows as well.
Treatment:
For the best possible outcome do not delay treatment! At this time, the gold standard approach is arthroscopic debridement (removal) of the fragmented cartilage and the surrounding diseased cartilage and subchondral bone. Curettage may allow the now vacant cartilage bed to fill in more quickly with what is called fibrocartilage. I likened the removal of the fragment to old wallpaper removal (very much oversimplified). Once the old wallpaper bubbles and tears, you need to remove all the damaged wallpaper in the periphery or else the wallpaper will continue to peel.
If the cartilage is an osteochondrosis (OC) lesion and has not fragmented (OCD) non-surgical treatments (activity restriction, dietary restriction, etc) may be attempted and successful. Unfortunately, if OCD has not occurred then the patient will not be limping and most of these dogs go undiagnosed. It is my belief that any dog exhibiting pain/lameness with the presence of a radiographic (x-ray) OCD lesion ,should have surgery. Surgery will benefit them both in the short term and the long term.
There are older techniques of opening the joint to get access to the cartilage flap, however the recovery time on this type of procedure is significantly longer than with arthroscopy. Also, potential complications are increased with an “open” technique than with arthroscopic techniques. Arthroscopy is a minimally invasive tool that allows us to both diagnose and treat this condition. Generally speaking the patient can walk on the surgery leg (even if both legs have surgery at the same time!) following an arthroscopic procedure. Generally 2-3 small ports are placed over the shoulder (2-4mm in length) and this allows us access to the joint and work within the joint.
Recovery and Rehabilitation:
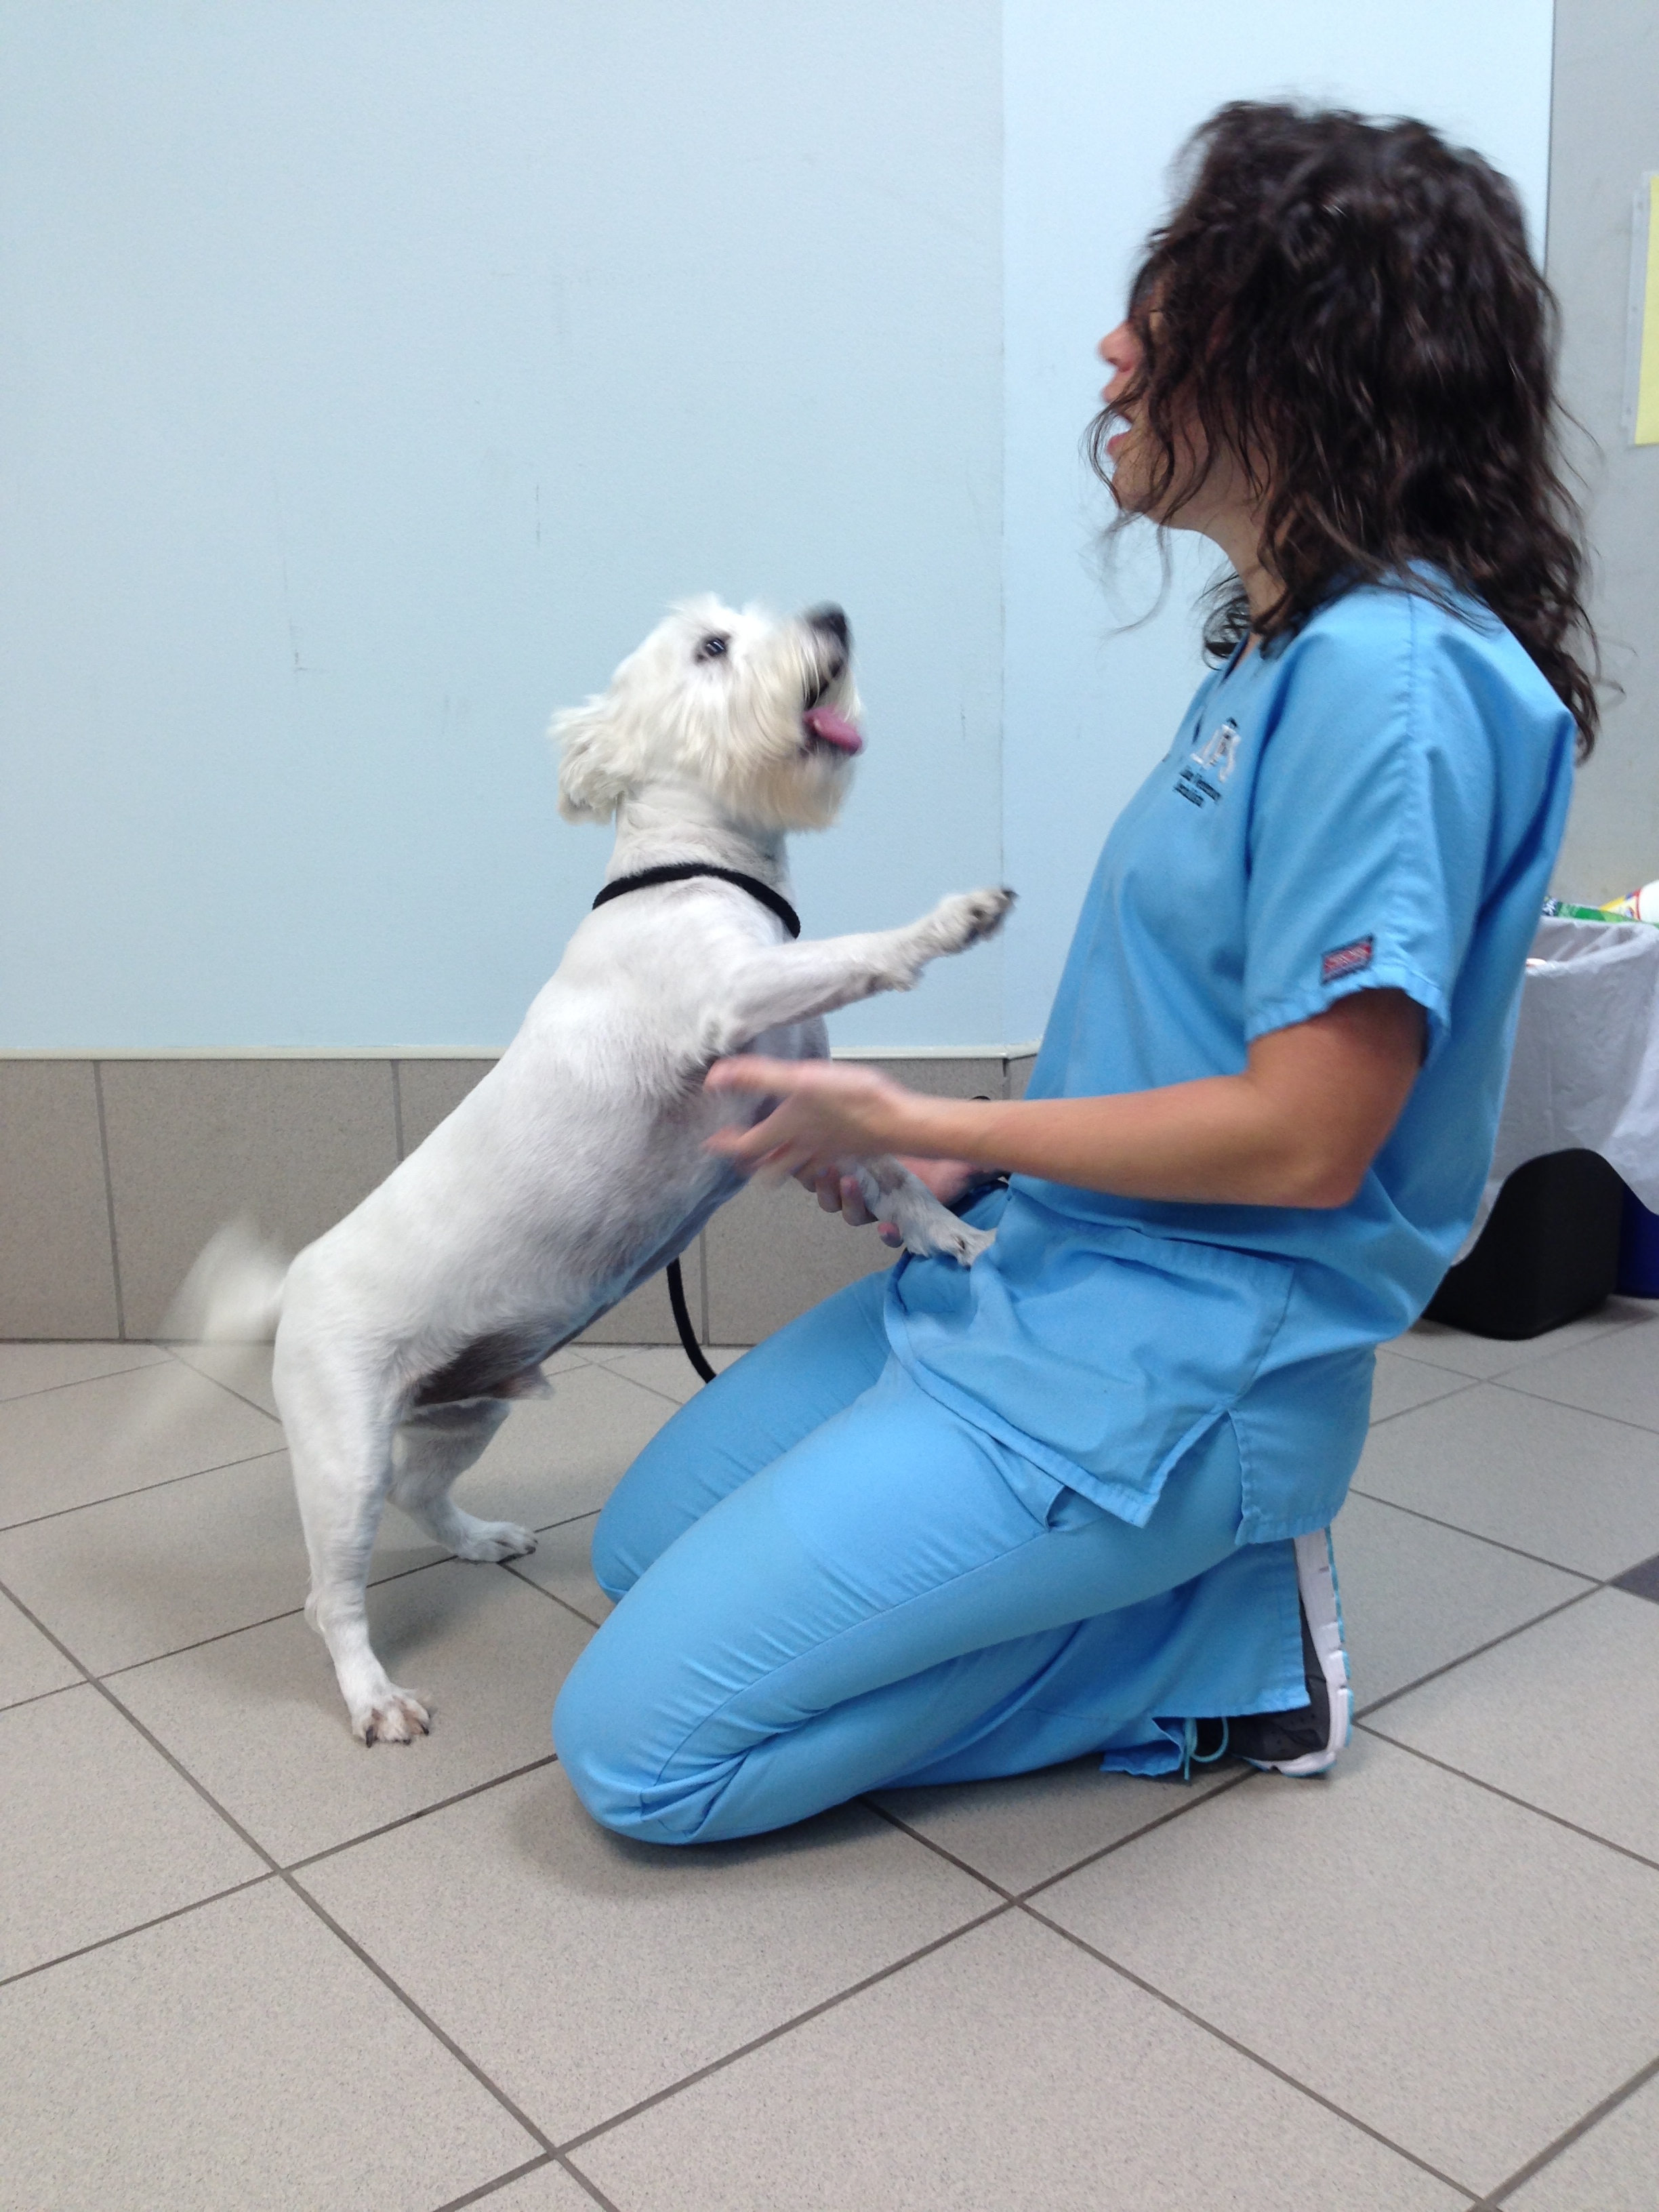
Recovery for the arthroscopic procedure is generally 4-6 weeks. Every surgeon has a different protocol for after surgery and I am very respectful of that. I prefer controlled movement for my patients. In the first two weeks, passive range of motion is very important, followed by active icing of the joint(s). Short leash based walks are started shortly after surgery and incrementally increased as we proceed through the recovery phase. Introduction into a formal rehabilitation program is recommended, however there are times when this is not possible and rehabilitation must be performed at home. Below is a patient that had a single shoulder arthroscopy, you can see how well they can walk following surgery (this is the following day)!
Prognosis:
When diagnosed and treated early, the dog affected with OCD can have a good prognosis and resume a normal or near normal activity level and quality of life. The longer the lesion is present, the more inflammation and arthritis will develop decreasing our success with surgery. Of the OCD lesions (shoulder, versus the other sites affected) this region has the best prognosis. I do encourage all my patients to continue on joint supplementation for life and to be removed from any breeding program.
Tido two weeks after surgery!!! You can’t keep him down!!!
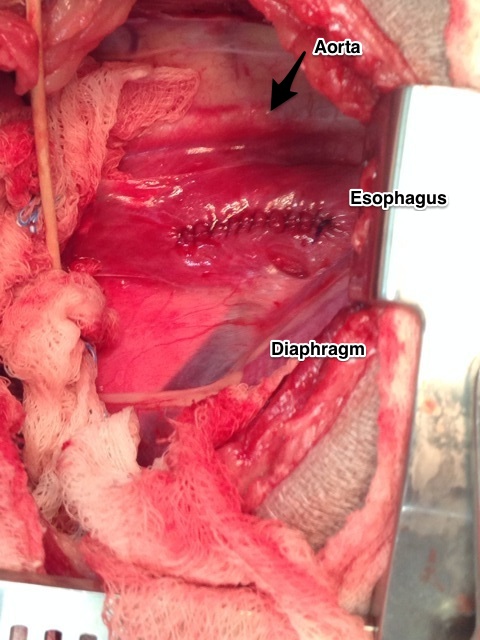
Meet Tido!!! Tido is a 6 1/2 year old West Highland White Terrier that came to us (Affiliated Veterinary Specialists – Orange Park) for a lower esophageal foreign body. He started showing signs of intermittent vomiting and regurgitation after swallowing his rawhide bone. Unfortunately, it became lodged in the portion of the esophagus that goes through his chest, just past his heart. Usually we can use a scope camera and remove the object without any incisions. The piece of rawhide was wedged in this area and was unable to be moved, so surgery was his only option.
This was the piece of rawhide that was lodged in Tido’s esophagus. It was nearly 4cm in length!!
An incision was made in the chest and the large piece of rawhide was found in the esophagus just past the heart. An incision was made into the esophagus and the rawhide was removed. Surgery on the esophagus is a very delicate surgery. In this area we have big vessels (aorta) above the esophagus and the vena cava below. Just in front of the esophagus is the heart. Nearby, there are very important nerves (vagus) that course over the esophagus. Also, the esophagus has a harder time healing versus other areas of the gastrointestinal tract with a higher chance of stricture (narrowing due to scar tissue) formation.
View of the esophagus just past the heart.
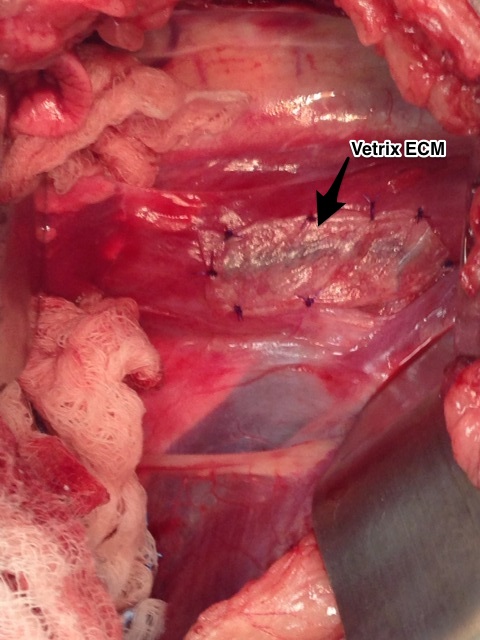
After the rawhide was removed, the esophagus was closed in two layers and then a Vetrix Extracellular Matrix (ECM) sheet was placed. This will aid in healing by providing a scaffold for the tissue to heal and incorporate the bodies own stem cells to infiltrate the area. After the esophagus was closed, Tido’s chest was closed in a standard fashion.
Vetrix Extracellular Matrix placement over the esophageal incision.
Tido made an excellent recovery!!! He has been on a soft diet and no rawhides for him!!! In four weeks he should be able to resume his normal activity. At his two week recheck, you could never tell he had surgery. Way to go Tido!!!
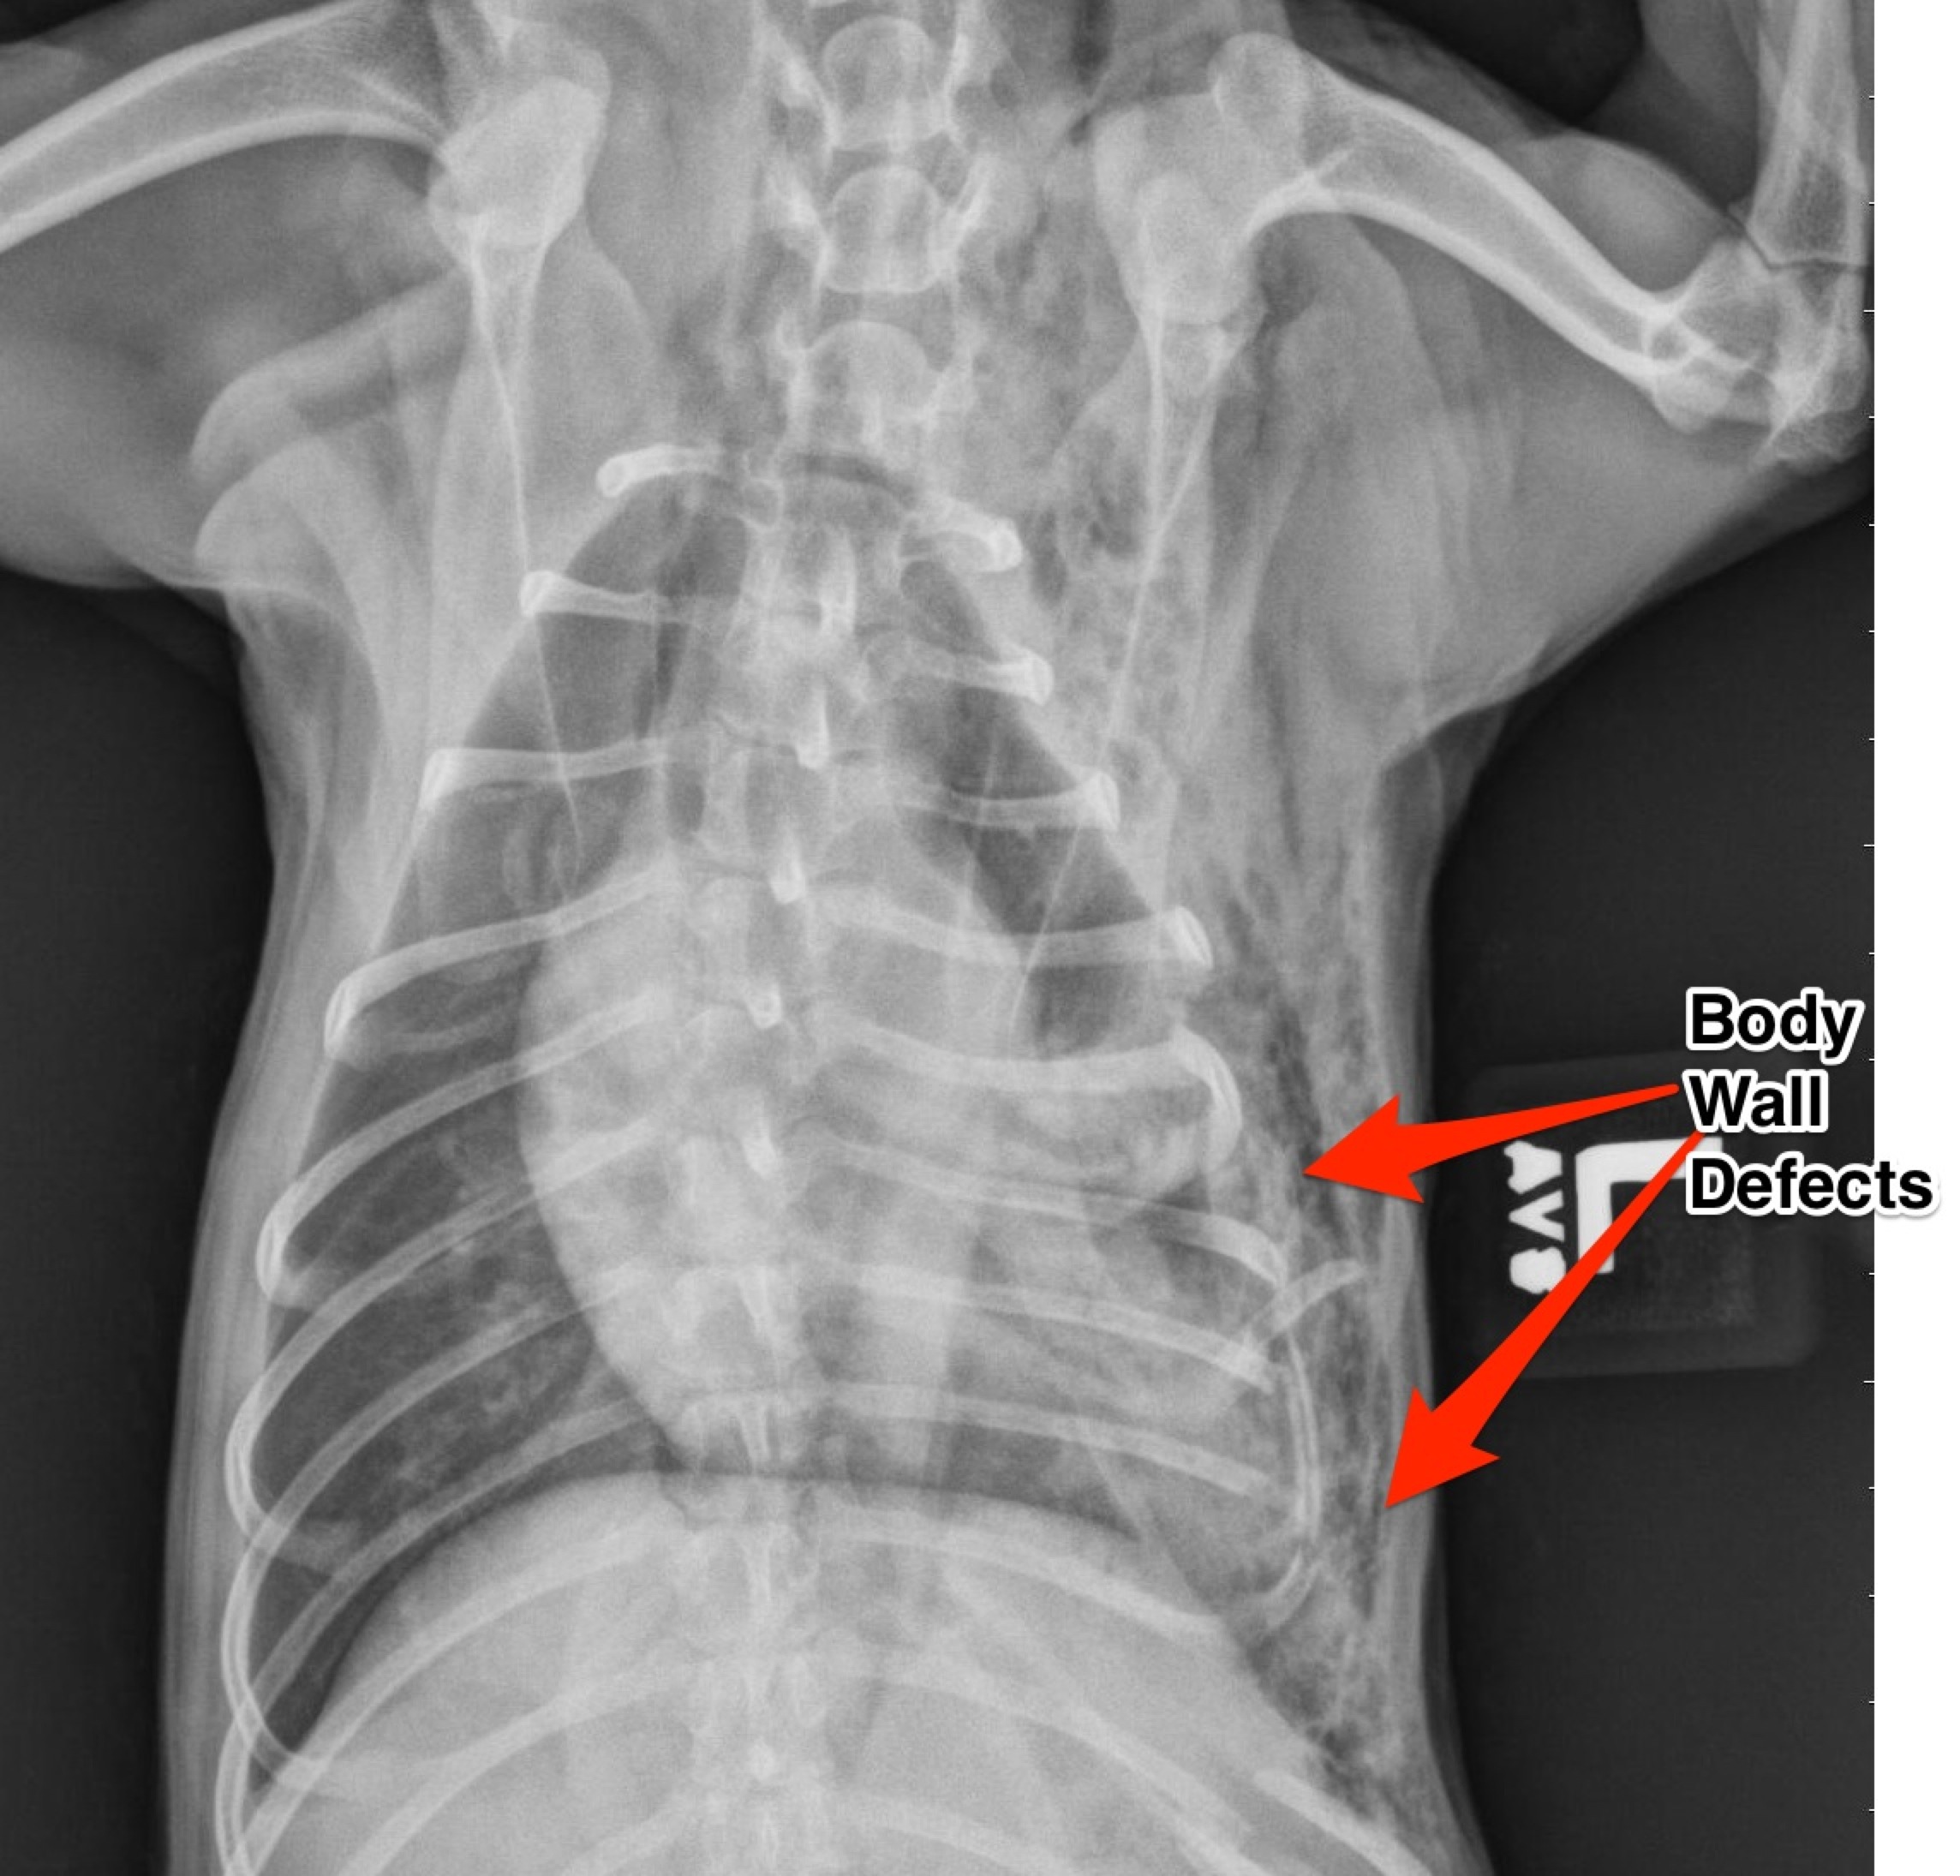
Smokey was transferred to the surgery department from the overnight emergency service after being attacked by a larger dog the night before. His injuries were multiple and severe. He sustained multiple bite wounds over his thoracic and abdominal body cavities. Thoracic radiographs revealed multiple left sided rib fractures and multiple defects (tears) into the chest wall. The bite wounds over the abdomen were superficial with no evidence of penetration in the abdomen.
Note the multiple rib fractures and the multiple thoracic wall defects.
Smokey was stabilized by the emergency service and prepared for surgery once transferred in the morning. Based on the injuries, Smokey had a thoracic exploratory to evaluate the thoracic wall wounds and subsequent internal injuries. Surgery revealed a large thoracic wall defect and multiple fragmented ribs, some of which needed to be removed. Interestingly, the left caudal (posterior) lung lobe had a large laceration caused by one of the rib fragments, necessitating removal of the lung lobe. The remaining thoracic wall defect was too large to close primarily.
The white arrow denotes the diaphragm, the red arrow is showing the muscle of the thoracic wall and the caudal edge of the heart and the black arrow denotes the great vessels (caudal vena cava and caudal aorta).
The thoracic wall defect was repaired using porcine small intestinal submucosa extracellular matrix sheets (Vetrix ECM). Note the placement of the ECM in the defect. The overlying muscle was freed and placed as a muscular flap over the ECM. Following the repair a thoracic tube was placed to maintain negative pressure in the chest following surgery. Smokey recovered well from surgery and was released 48 hours following surgery. Two weeks later at his suture removal and he is doing great!
This is demonstrating the placement of the Vetrix ECM sheet for repair of the thoracic wall.
Here are some of the diagnostics that were performed on Frankie. As mentioned before, during his first visit a thorough examination was performed, which revealed congenital issues on all limbs. Also, when he presented he was overweight (for a 6 month old puppy). We do know that too rapid growth and obesity at a young age can preferentially express the genes responsible for these issues and exacerbate signs.
Here are his physical exam findings: lameness noted in all limb, more pronounced on his left side. Pain on hyperextension and hyperflexion of both elbows and pain on palpation of the medial (inside) compartment of both elbows. Pain on hyperextension and hyperflexion of both hips. Positive Ortolani tests on both hips – this is were the femoral head portion of the hip can be pushed out of the acetabulum (socket) and then falls back in; I have downloaded a video displaying this on Frankie.
Our first steps in diagnosis was to perform radiographs (x-rays) and a CT scan of the elbows. The x-rays confirmed both elbow dysplasia and hip dysplasia. Interestingly, Frankie had bilateral Osteochondritis Dissecans lesions, which isn’t commonly seen, but can be a part of elbow dysplasia.
The CT scan demonstrates the same lesions as the x-rays, but gives a different view. A CT scan is a very sensitive diagnostic test for elbow pathology, especially in cases that have not developed normal x-rays changes yet.
I want to share this story of Frankie with everyone, as it will be an ongoing story for the next year or so as we continue to help him though this hard time. Frankie was seen by me about two months ago when he was six months old. He is a Golden Retriever that presented for lameness in all legs. He had been enrolled in a service dog program when his owners started to realize that he was having trouble walking. He was referred to me after being evaluated by a local neurologist, who couldn’t diagnose a neurologic issue.
On presentation, Frankie had lameness (limping) in all four limbs. He had pain on manipulation of both elbows, especially when pressure was placed on the inside of the elbows. He had a shortened stride to both hind limbs and was painful on hyperflexion and hyperextension of both hips. Another interesting finding, was that both hips could be felt subluxating on exam (positive ortolani test). This means that you could feel the femoral head rub and partially come out of joint.
Radiographs (x-rays) were taken of all joints and a diagnosis of bilateral elbow dysplasia (osteochondrosis dissecans (OCD) and fragmented coronoid process) and bilateral hip dysplasia was made. Unfortunately, Frankie’s career as a service dogs had to abruptly end. Because of the extensive orthopedic work that would be needed (both elbows and both hips) he was in need of a new home to care for his special needs. My wife and I may be a glutton for punishment, but we thought long and hard about this decision and decided to open our home and give this Golden puppy a second chance.
So my intention for this “Featured Article” segment is to follow the course of Frankie’s treatment including surgery, recovery, physical therapy, and final outcome. I feel that other owners may be in similar circumstances and this may help encourage some and educate others. This will also give a forum to discuss congenital issues such as elbow dysplasia and hip dysplasia. Going through these issues on our own pet, has been an eye-opening experience for us and me professionally. I can now relate to my patients and clients on a much more personal level.
In future segments (soon to follow) we will go through diagnosis, diagnostic test (radiographs and CT scan) and surgeries. So far, Frankie has had surgery on one elbow and is recovering well from that, we will go into more specifics as we go. The plan will be for the other elbow in the near future and then total hip replacements.
Also, please do not ask to donate financially to Frankie, I am not trying to raise money. I am just trying to educate others. There are so many generous people out there and there are many charitable animal organizations that can benefit from your generosity, as it is always appreciated!